Building a bare-metal Kubernetes cluster on Raspberry Pi
Sep 12, 2023 (updated)@anthonynsimon
In this post I’ll be walking you step by step on how I built a bare-metal, 3-node Kubernetes cluster running on Raspberry Pis. I'll also share some tips and tricks I learned along the way, and towards the end I'll honor the classic "I run my blog on Kubernetes" meme by deploying a basic Ghost server.
 The already assembled cluster.
While this is not meant to be a tutorial, feel free to use my article as reference if you’re building a cluster too. You can add more nodes if you'd like. I chose three nodes simply because I’d run out of budget otherwise. After all, it's just a hobby project.
There's lots of guides on the internet on how to build similar clusters, with different parts and specs. It all comes down to your own preferences. For example, you can check out Alex Ellis' Blog for inspiration, he has lots of great material on the subject there.
Table of contents
- The showcase
- How much does the Raspberry Pi cluster cost
- Network topology
- Assembling the Raspberry Pi’s cluster
- Flashing the OS image
- Setting up the router
- What is K3s and how is it different than Kubernetes
- Installing K3s on the Raspberry Pi
- Accessing K3s from my dev laptop
- First deploy: Kubernetes dashboard
- Deploying a Ghost blog on Kubernetes
- Next steps
- Bonus: Using NGINX instead of traefik as ingress
- Bonus: Building cross-platform Docker images
- Bonus: Basic node/pod monitoring
The showcase
This is the part which sounds like I'm trying to convince you to build it too:
 Easy on the eyes, don't you think?
It’s small, but mighty: 3x Raspberry Pi 4B (4 CPU, 8 GB RAM each), running Ubuntu Server 64-bit. That's 12 CPUs, 24 GB memory in total - plenty of room for running multiple projects.
Energy, and cable efficient: All nodes are ARM64. I’m using Power-over-Ethernet (PoE) to supply networking and energy over a single cable per cluster node.
Simple: Uses K3s - a lightweight and ARM-optimized Kubernetes. It was a breeze to install. I went from vanilla Ubuntu to kubectl apply in a couple of minutes.
Self-contained: It’s portable and wirelessly connects to any network, so I can work on this cluster anywhere I go. The nodes live within their own private network. I simply plug one power cable, and the cluster is up and running.
How much does the Raspberry Pi cluster cost
For reference purposes, here's the list of parts needed, and approximate price.
The reference prices below do not include shipping/import tax costs, since that depends on where you're located.
| Item | Unit price in USD |
|---|---|
| 3x Raspberry Pi 4B 8GB | $87.04 |
| 3x Mini PoE expansion board (fanless) | $23.10 |
| 3x SanDisk Micro SD card 32 GB | $10.87 |
| 5x 0.5m CAT6 Ethernet cables | $3.65 |
| 1x Cloudlet cluster case (incl. fans) | $75.21 |
| 1x TP-Link 5-Port Gigabit PoE Switch | $45.18 |
| 1x TP-Link Nano Router WLAN | $39.68 |
| 1x Micro SD card reader with USB-C connector | $15.87 |
| 1x Pack of cable straps | $9.15 |
| Total | $566.37 |
If you want to lower the cost, consider purchasing the 4 GB models, a more basic case, and don't go for a PoE capable network switch. Just don't forget to find an alternative way to power the Raspberry Pis if you opt for a non-PoE solution.
Next let's talk about networking. My cluster lives on its own private network, which brings a few advantages vs joining everything over my home WiFi.
Network topology
As cliché as it may sound, I do believe a picture is worth a thousand words. That's why I made the following diagram, illustrating the network topology for my cluster and home network:
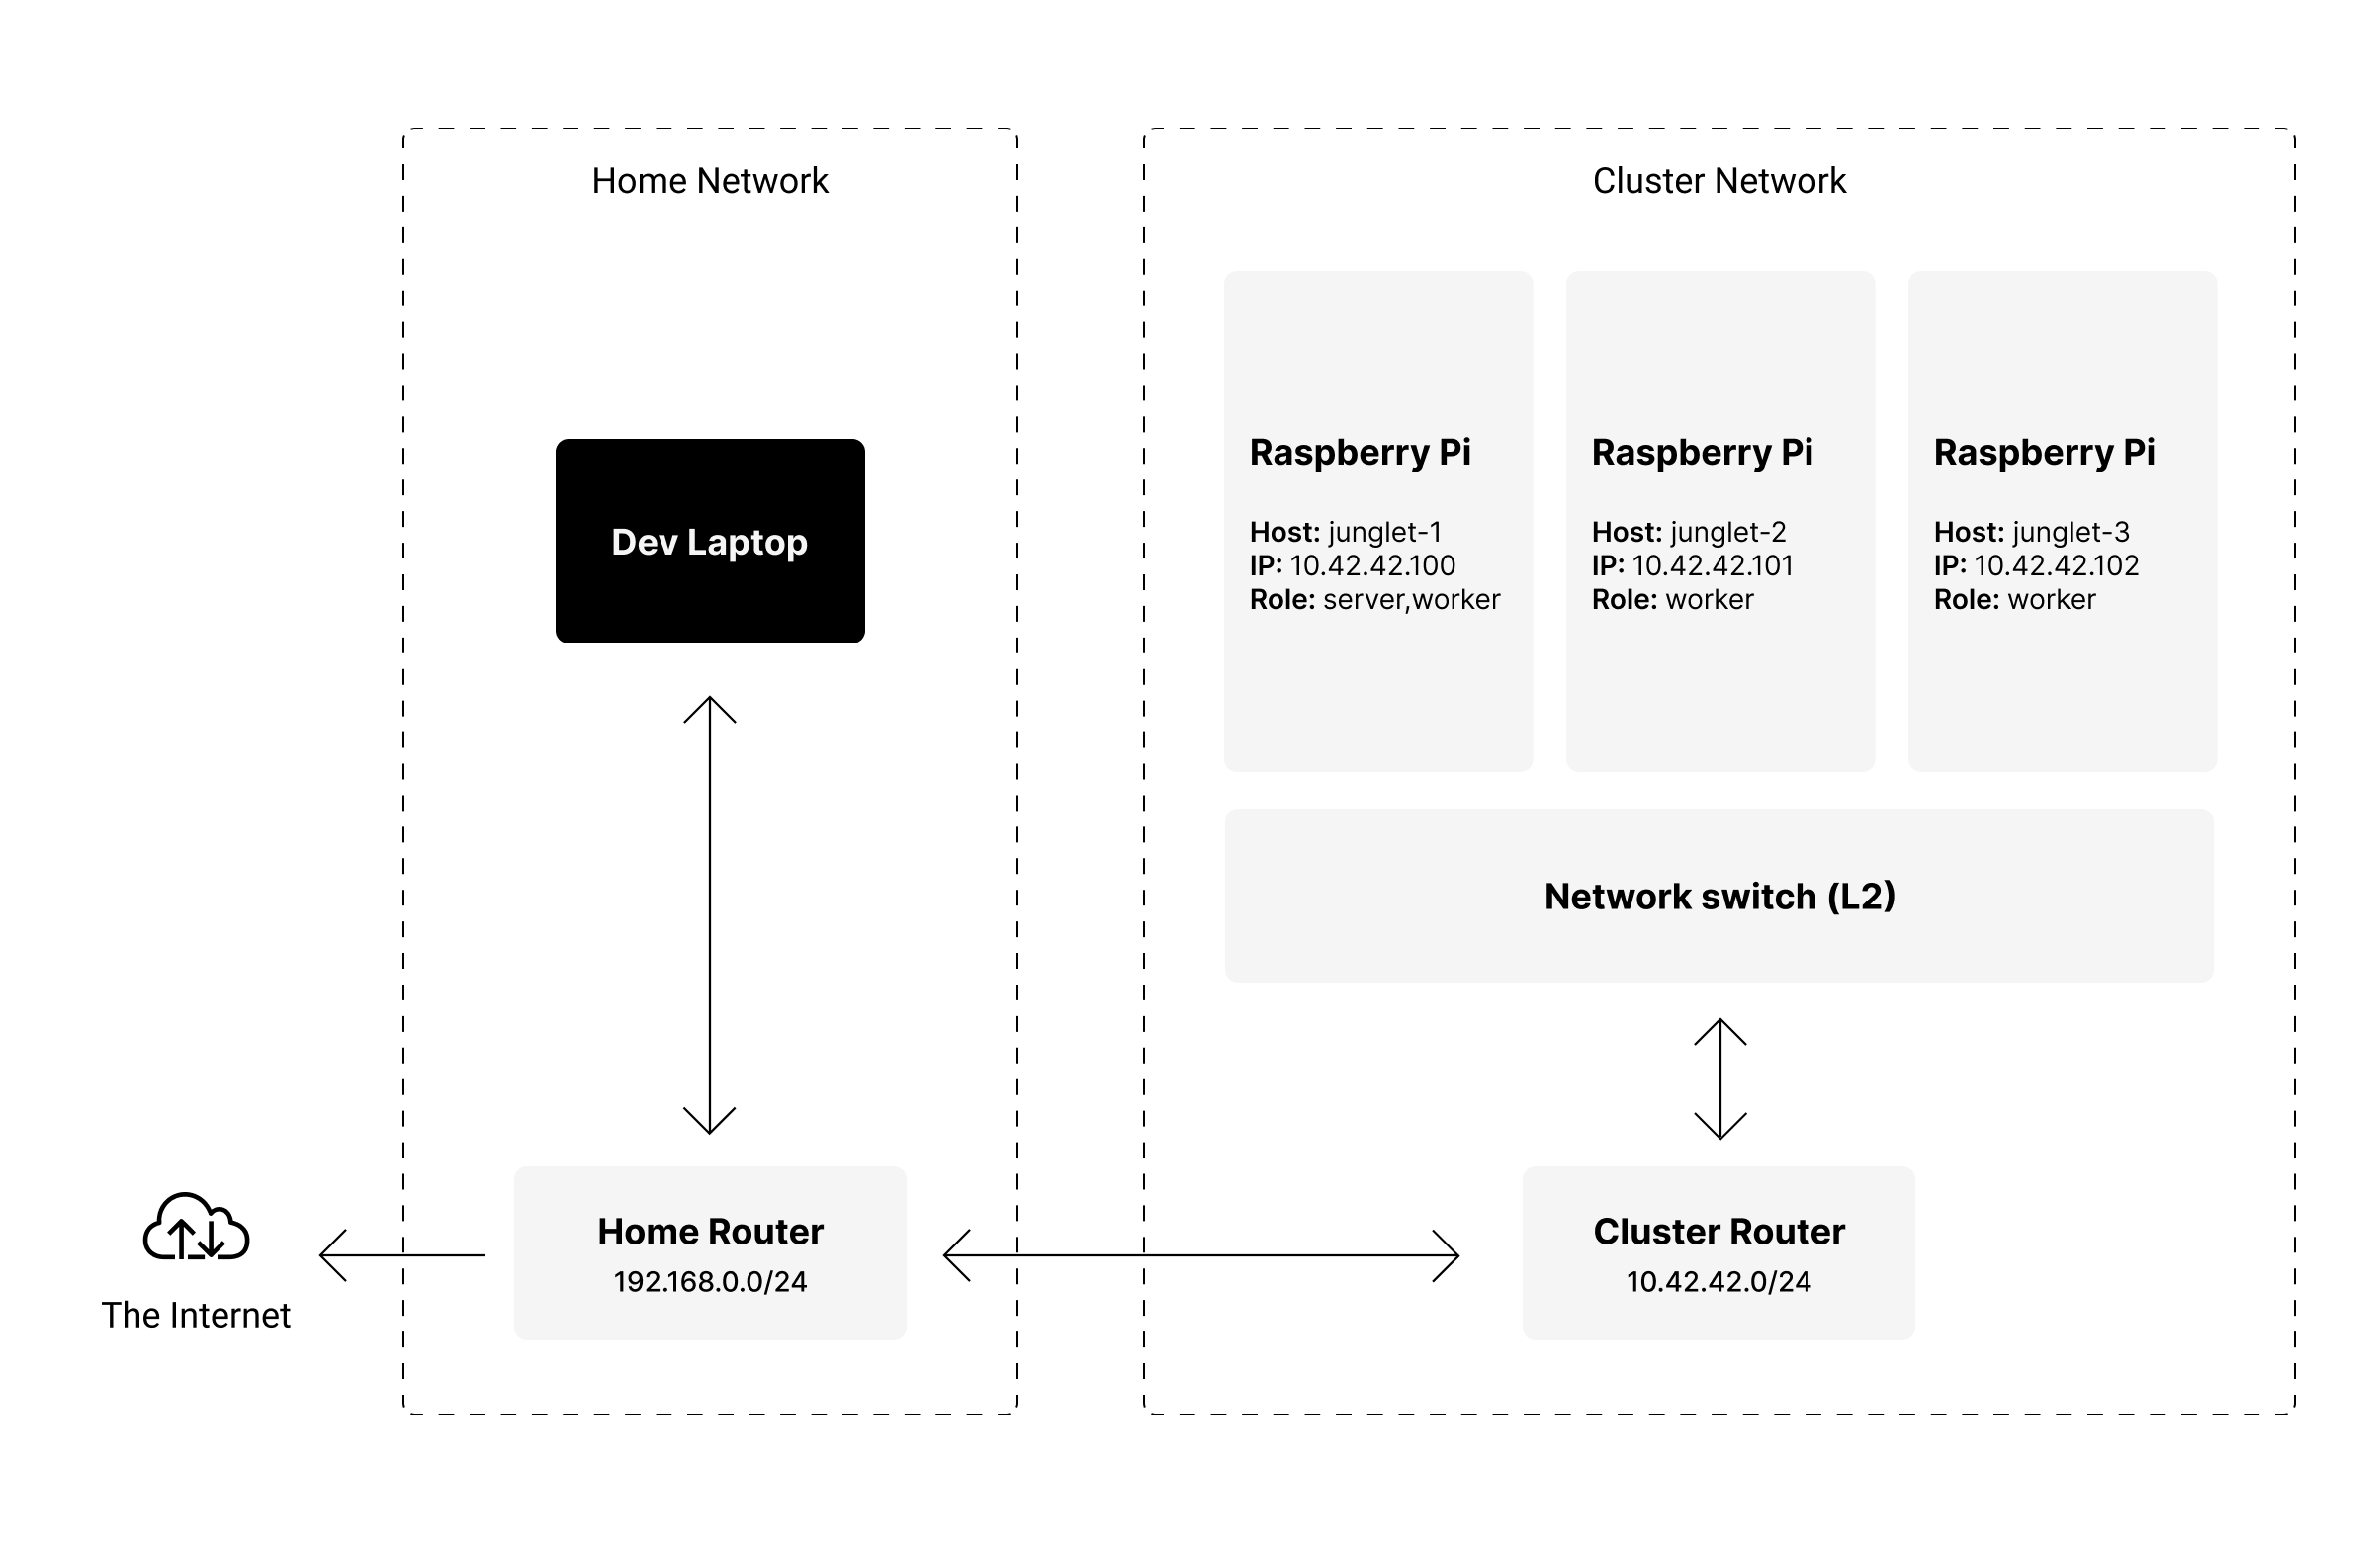
Essentially, the nodes and the router talk to each other via the network switch on a wired connection, while the router serves as a gateway to the Internet via WiFi.
Having the cluster on a private network means that I have full control over the IP addresses of each node, even if I join different networks on the go. This makes the cluster portable, and easy to access without having to reconfigure routers, or my development environment.
Each node gets a static IP address assigned to them (instead of using the router's DHCP), which makes cluster node discovery much easier since each host is available at a predictable address. The router also serves as an Internet Gateway (connects the local network to the Internet).
Using a network switch with Power-over-Ethernet means I can just plug it to power, and the whole cluster is up and running. Each node gets networking and power from a single cable. Keeps things tidy, and simple.
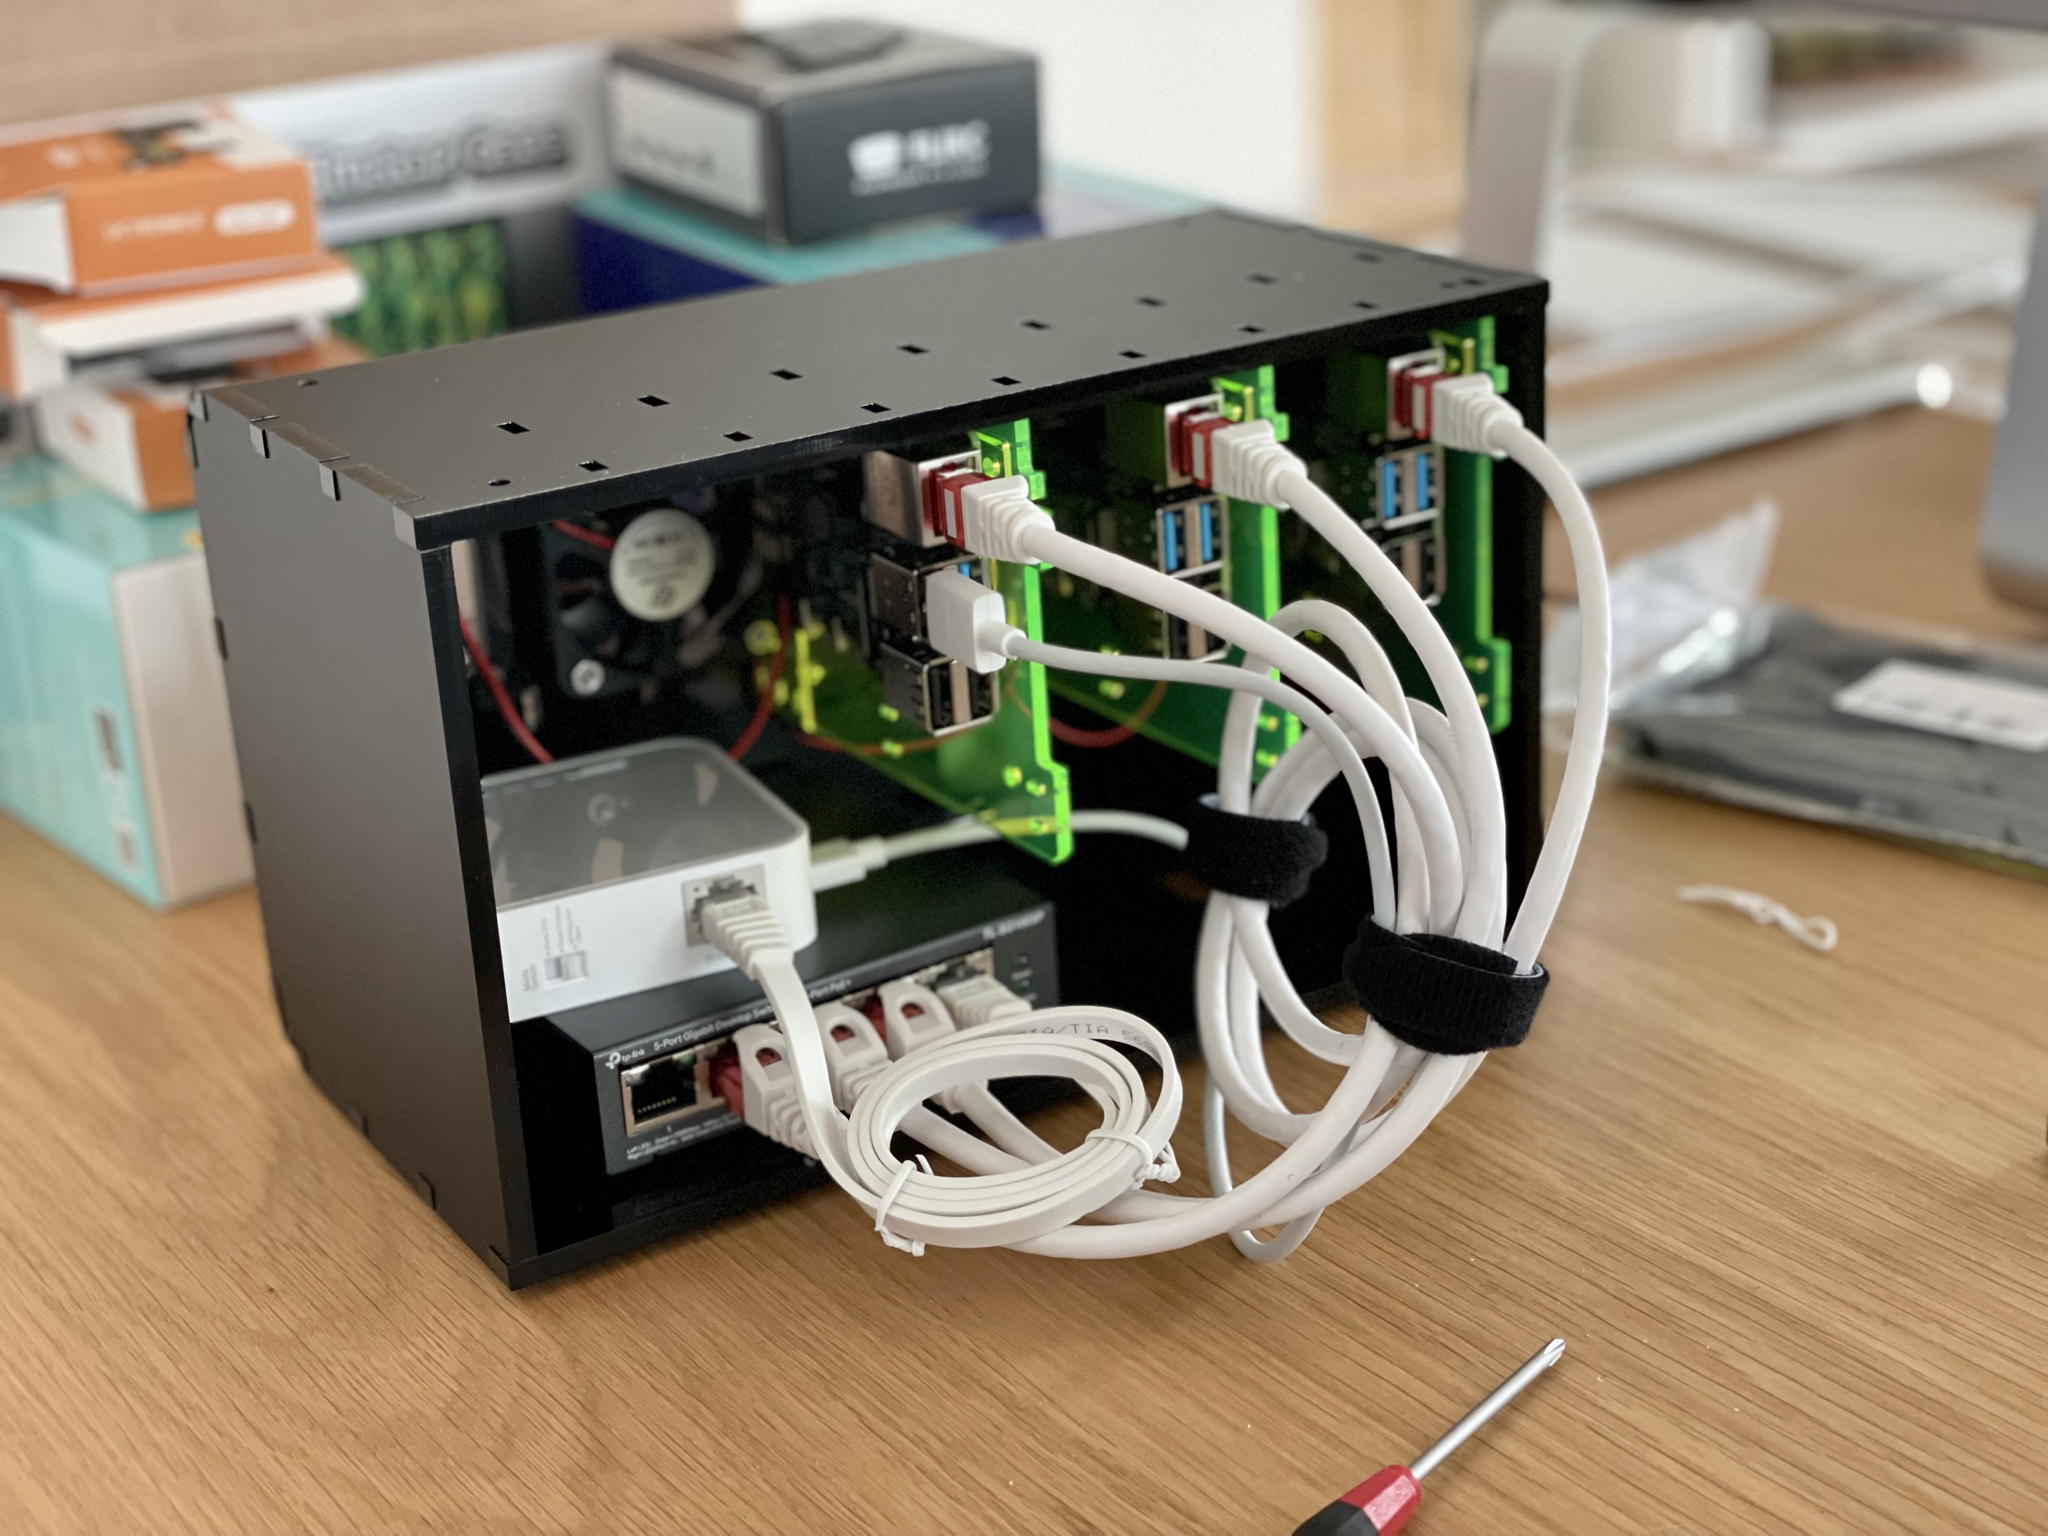
Assembling the Raspberry Pi’s cluster
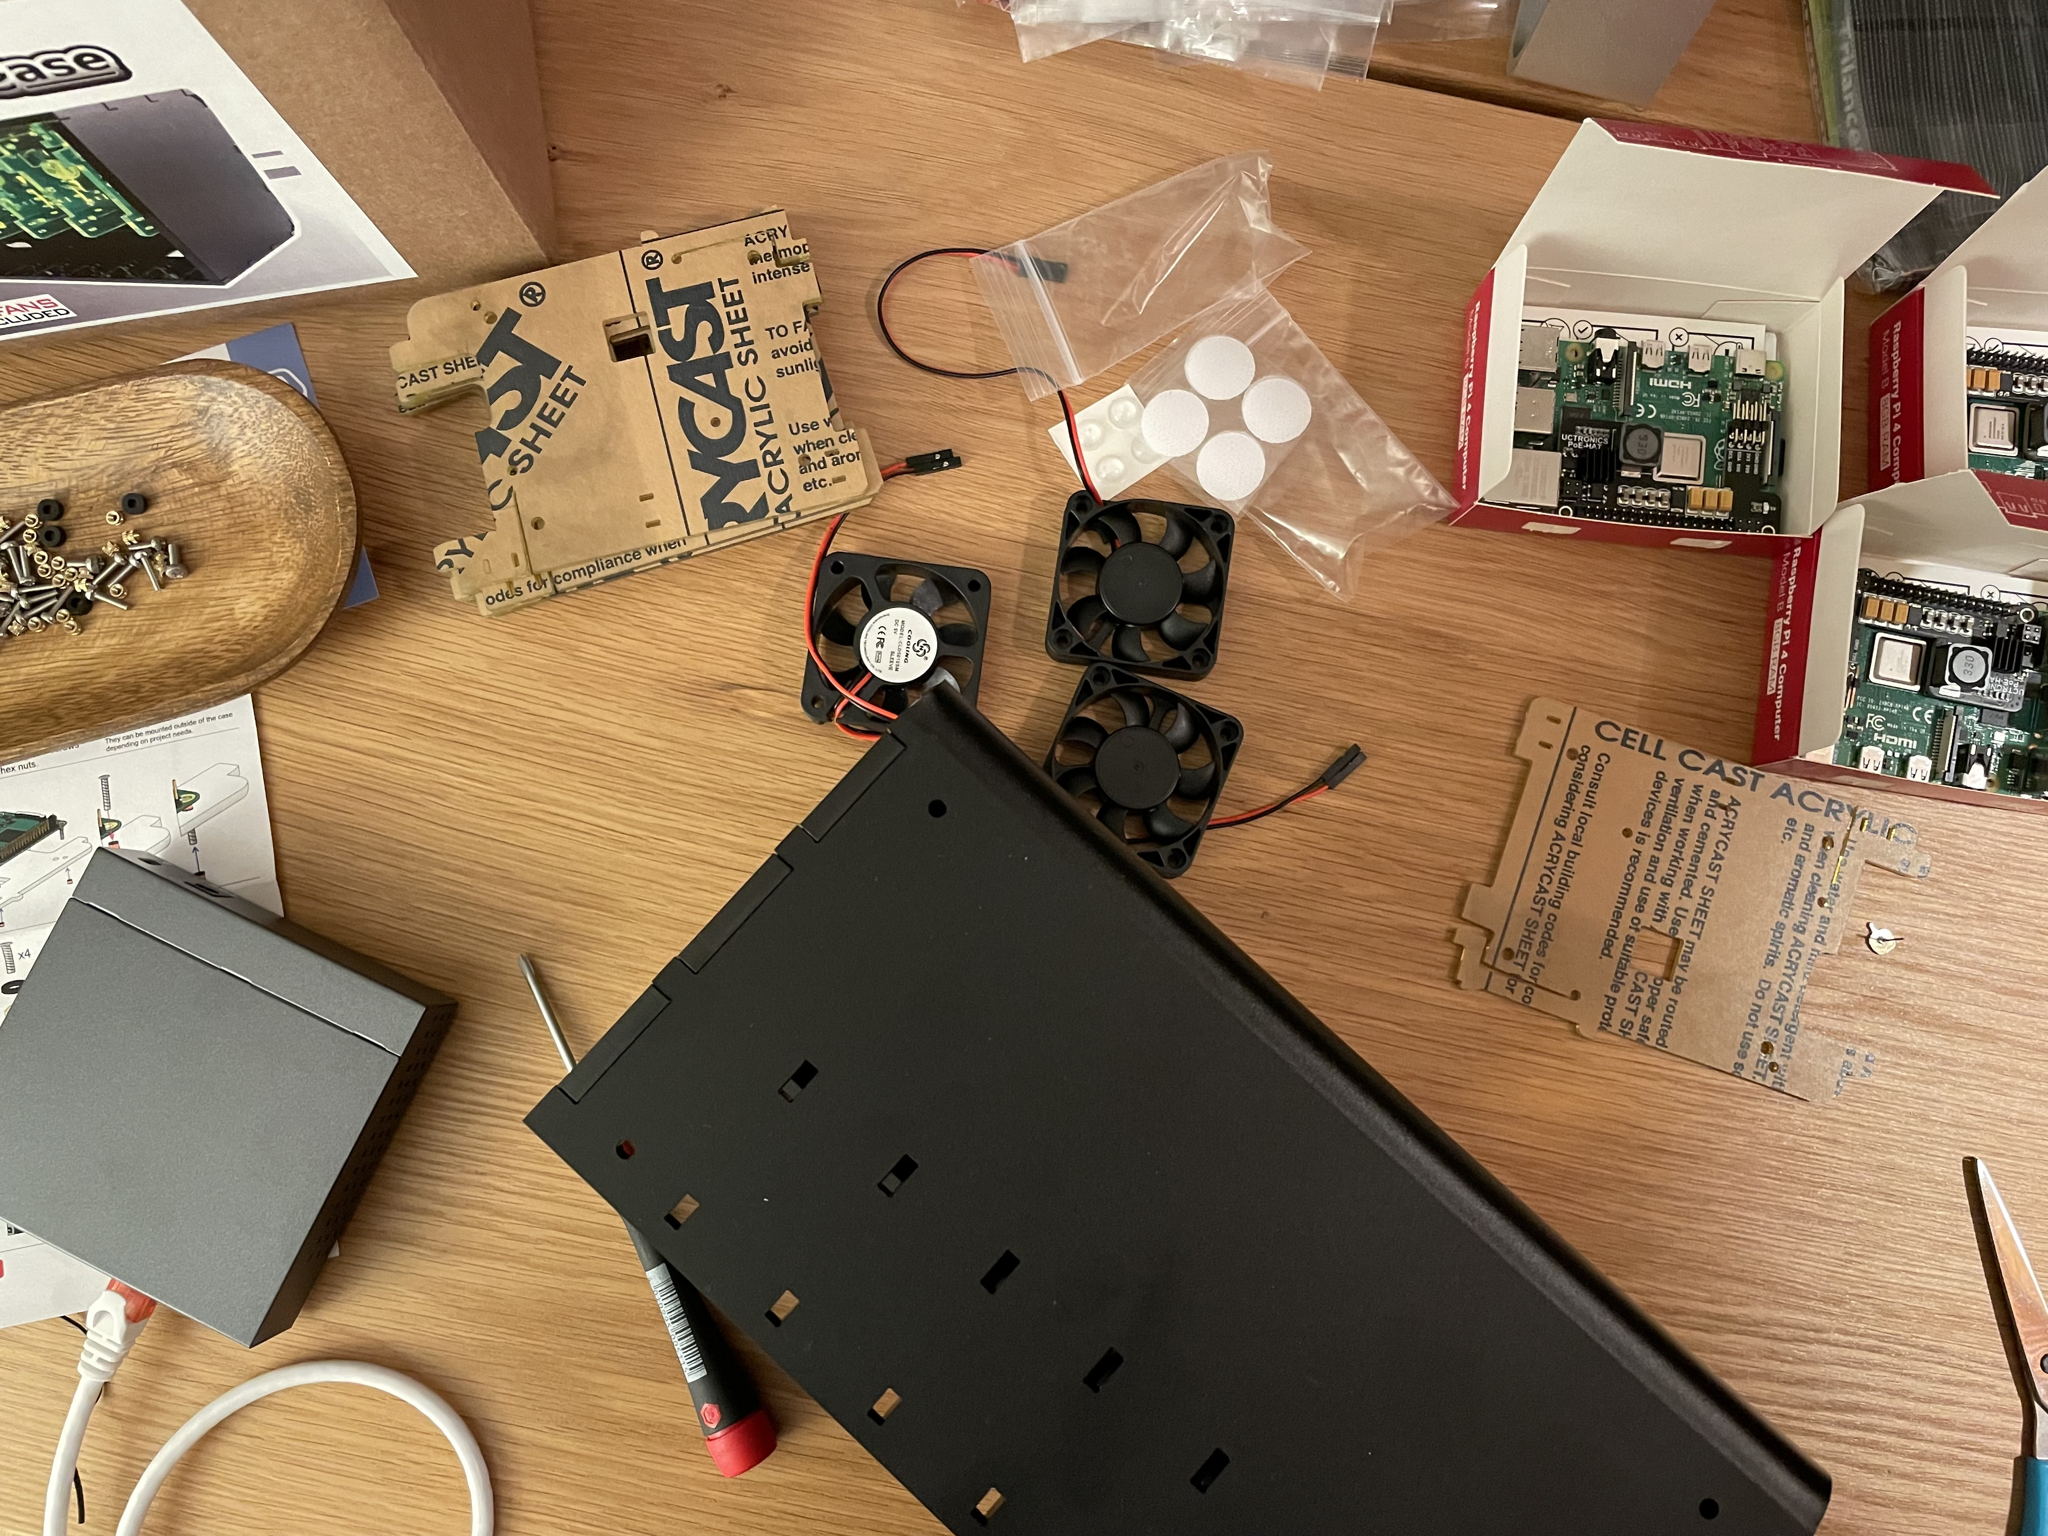
To assemble the cluster, I started by preparing the cluster case and fans. Essentially it consisted of screwing the fans to the back of the case, and deciding which slots to use for each Raspberry Pi so that it could also fit the router and switch inside the box.
 You know you're in for a fun night when your desk looks like this.
I prepared each Raspberry Pi by attaching the PoE hat and the bundled heatsink to the board. I then inserted the micro SD card with the flashed OS image (more on that later).
Once ready, I simply attached each Raspberry Pi to the slot plate, which is what will hold them to the cluster case.
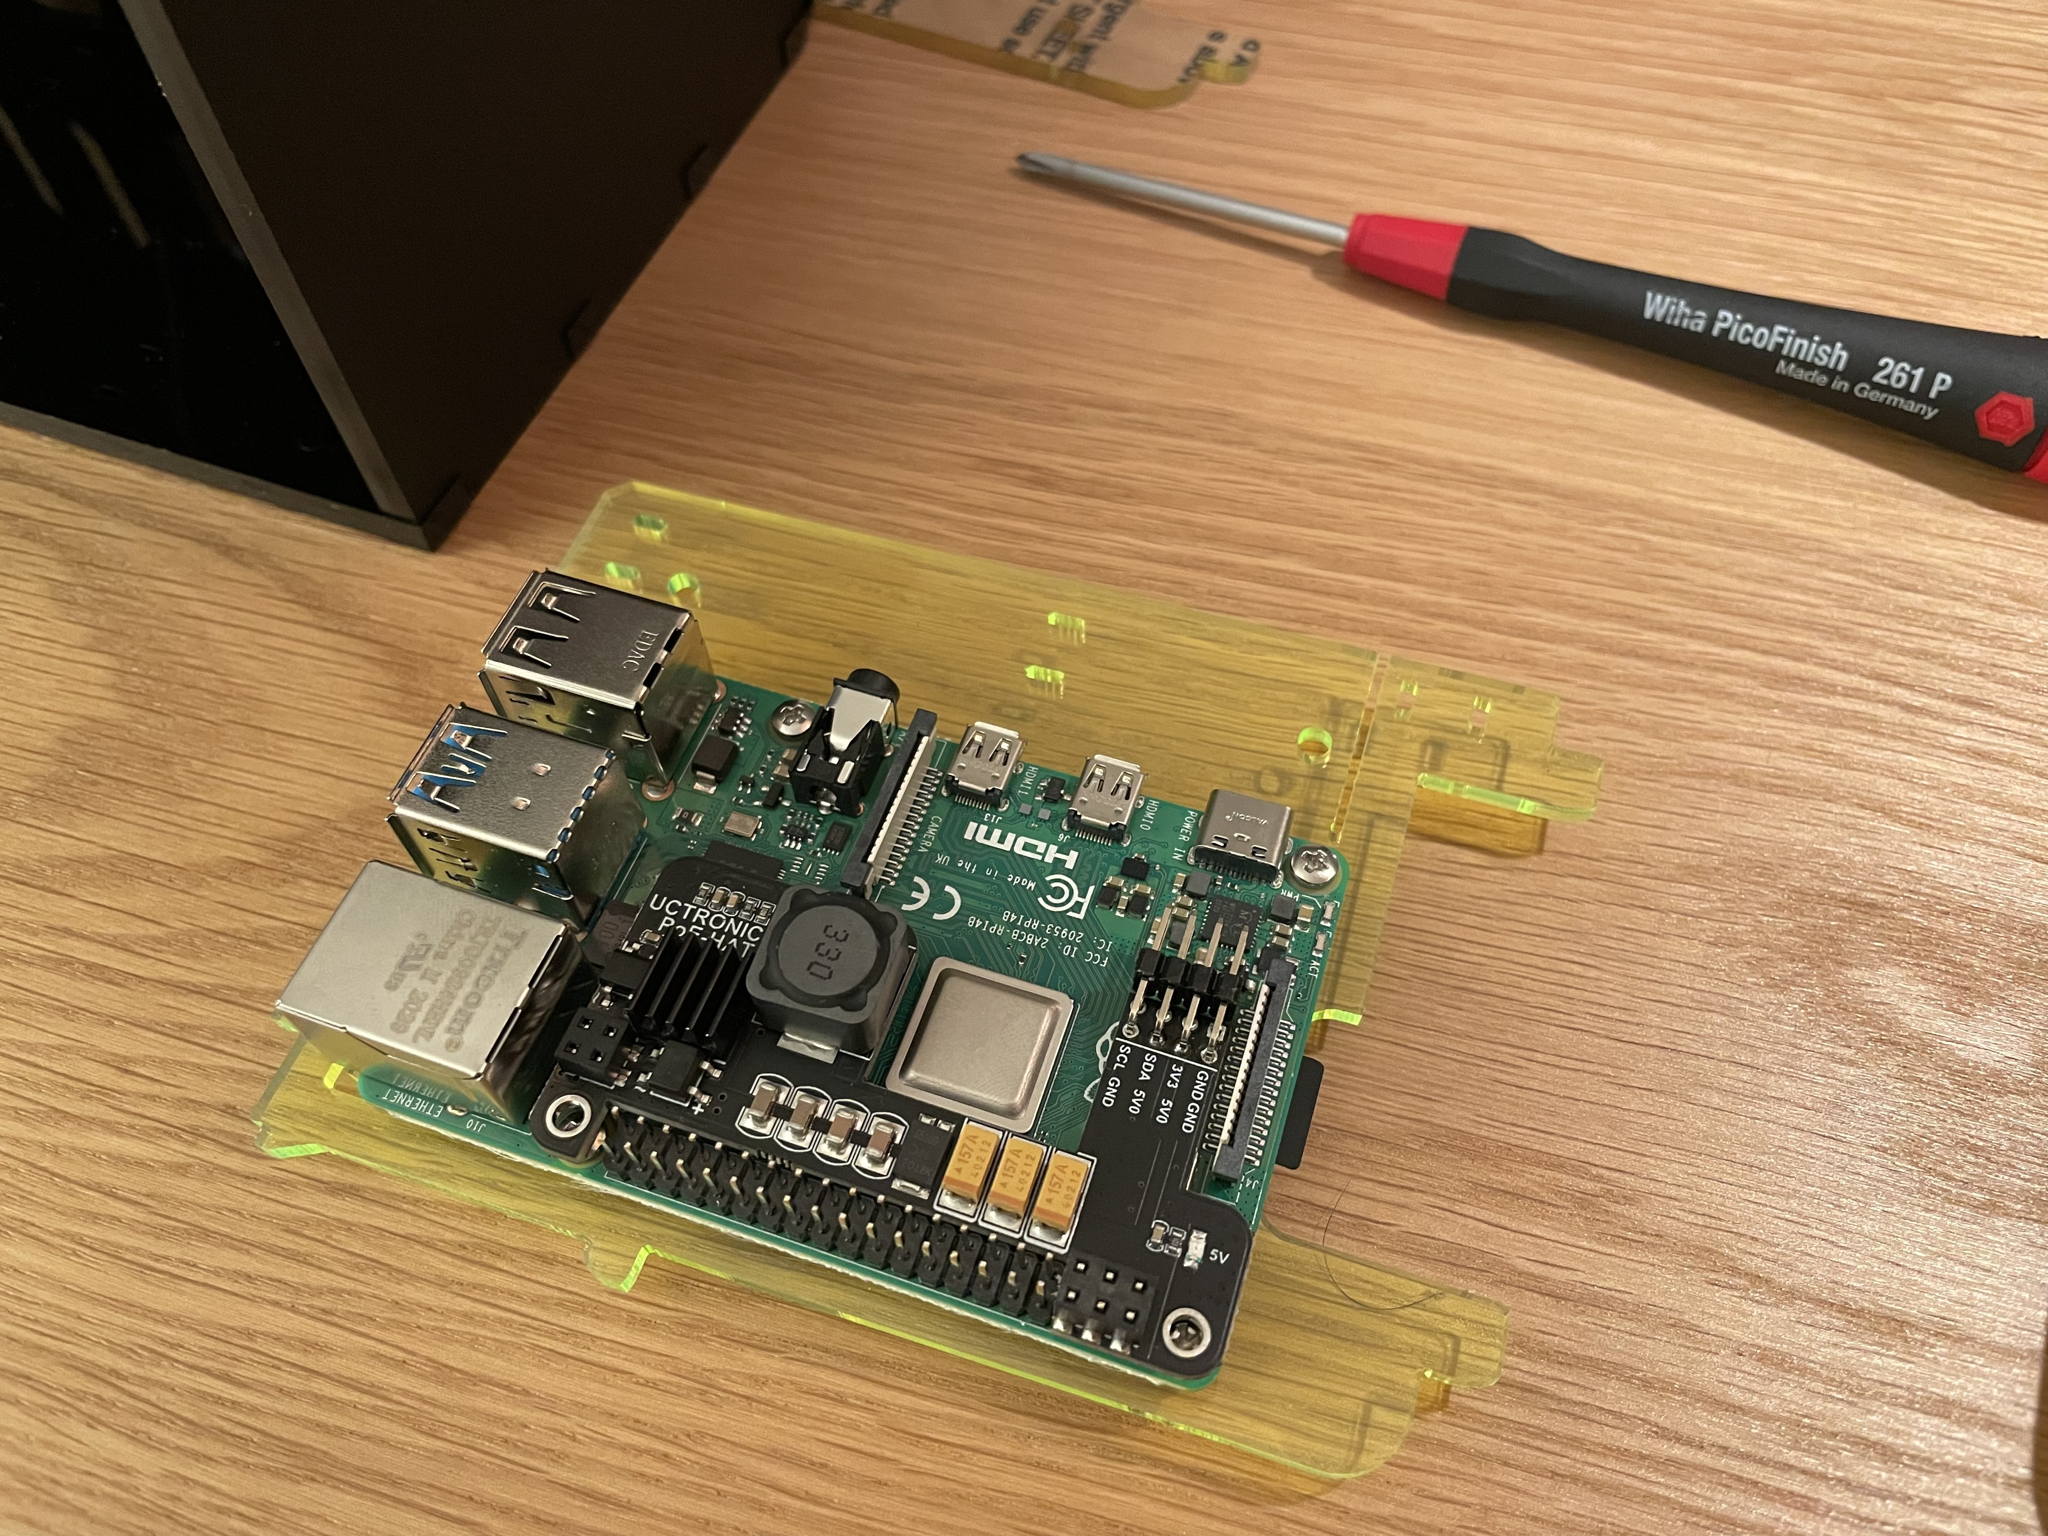 The Raspberry Pi 4 with the PoE hat already fitted in, and attached to the cluster slot plate.
I then plugged each Raspberry Pi to a fan (the fan is powered by the board's GPIO), and inserted them into the cluster case slot.
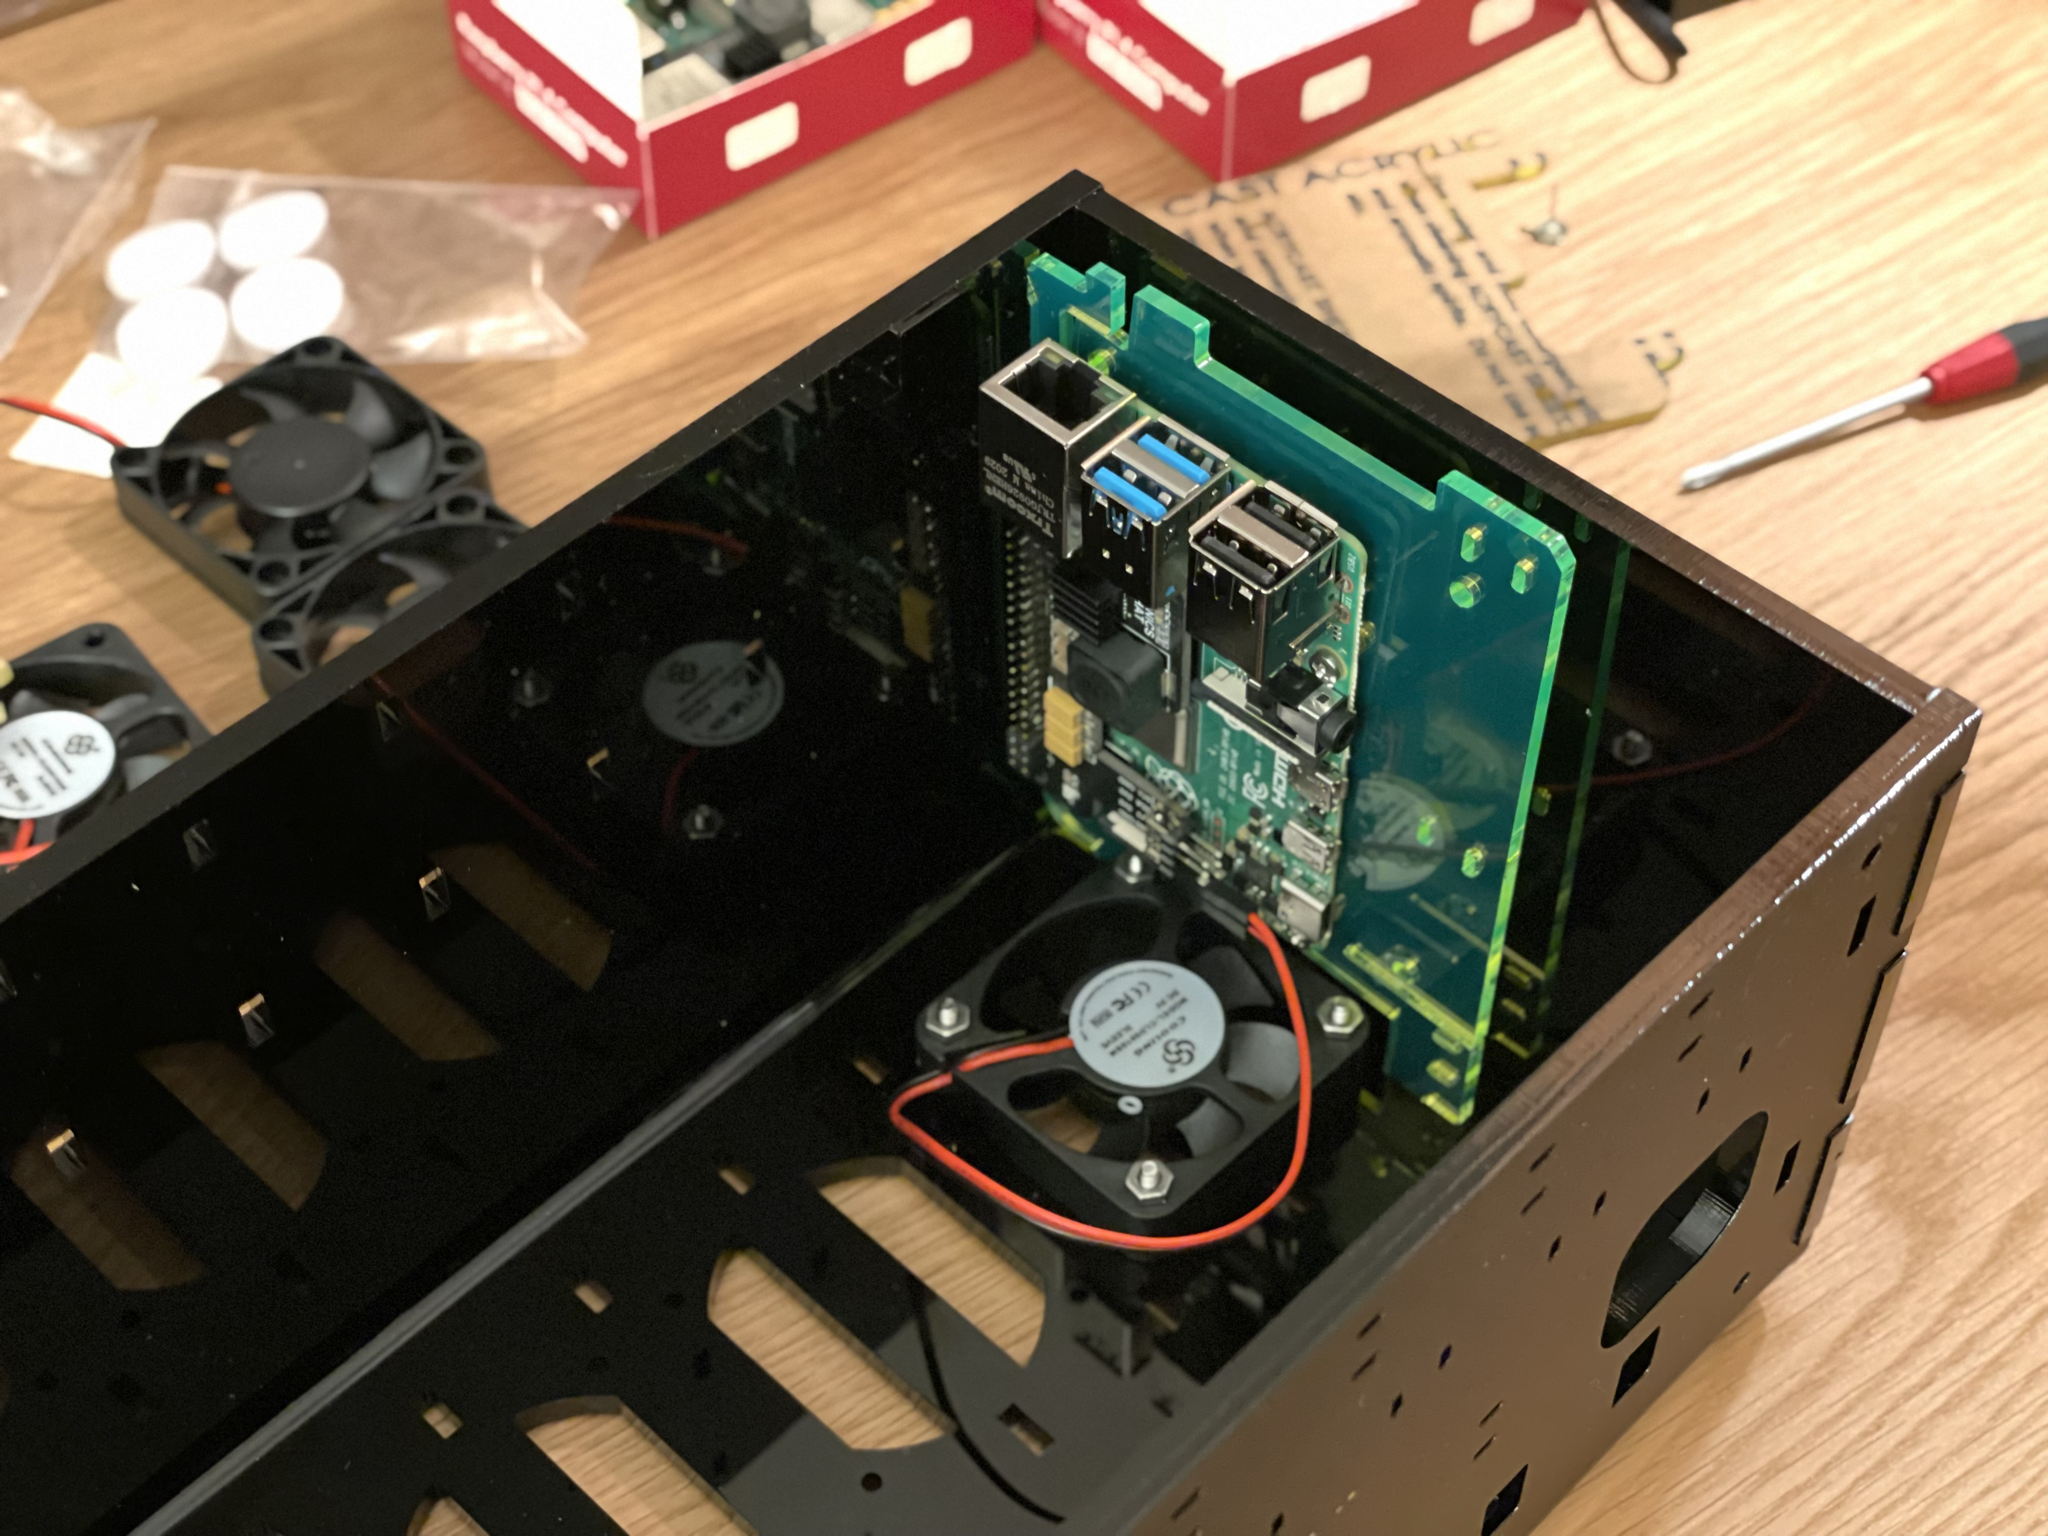 The first of three Raspberry Pi and fan slots.
Once that was done, I connected each Raspberry Pi to the network switch via an Ethernet cable. Finally, I also connected the router to the switch, and give it power by using one of the USB-C ports on the Raspberry Pi. That means in one way or another, everything is powered by the switch.
Now all I have to do is to plug the switch to the power outlet, and done! The cluster is alive.
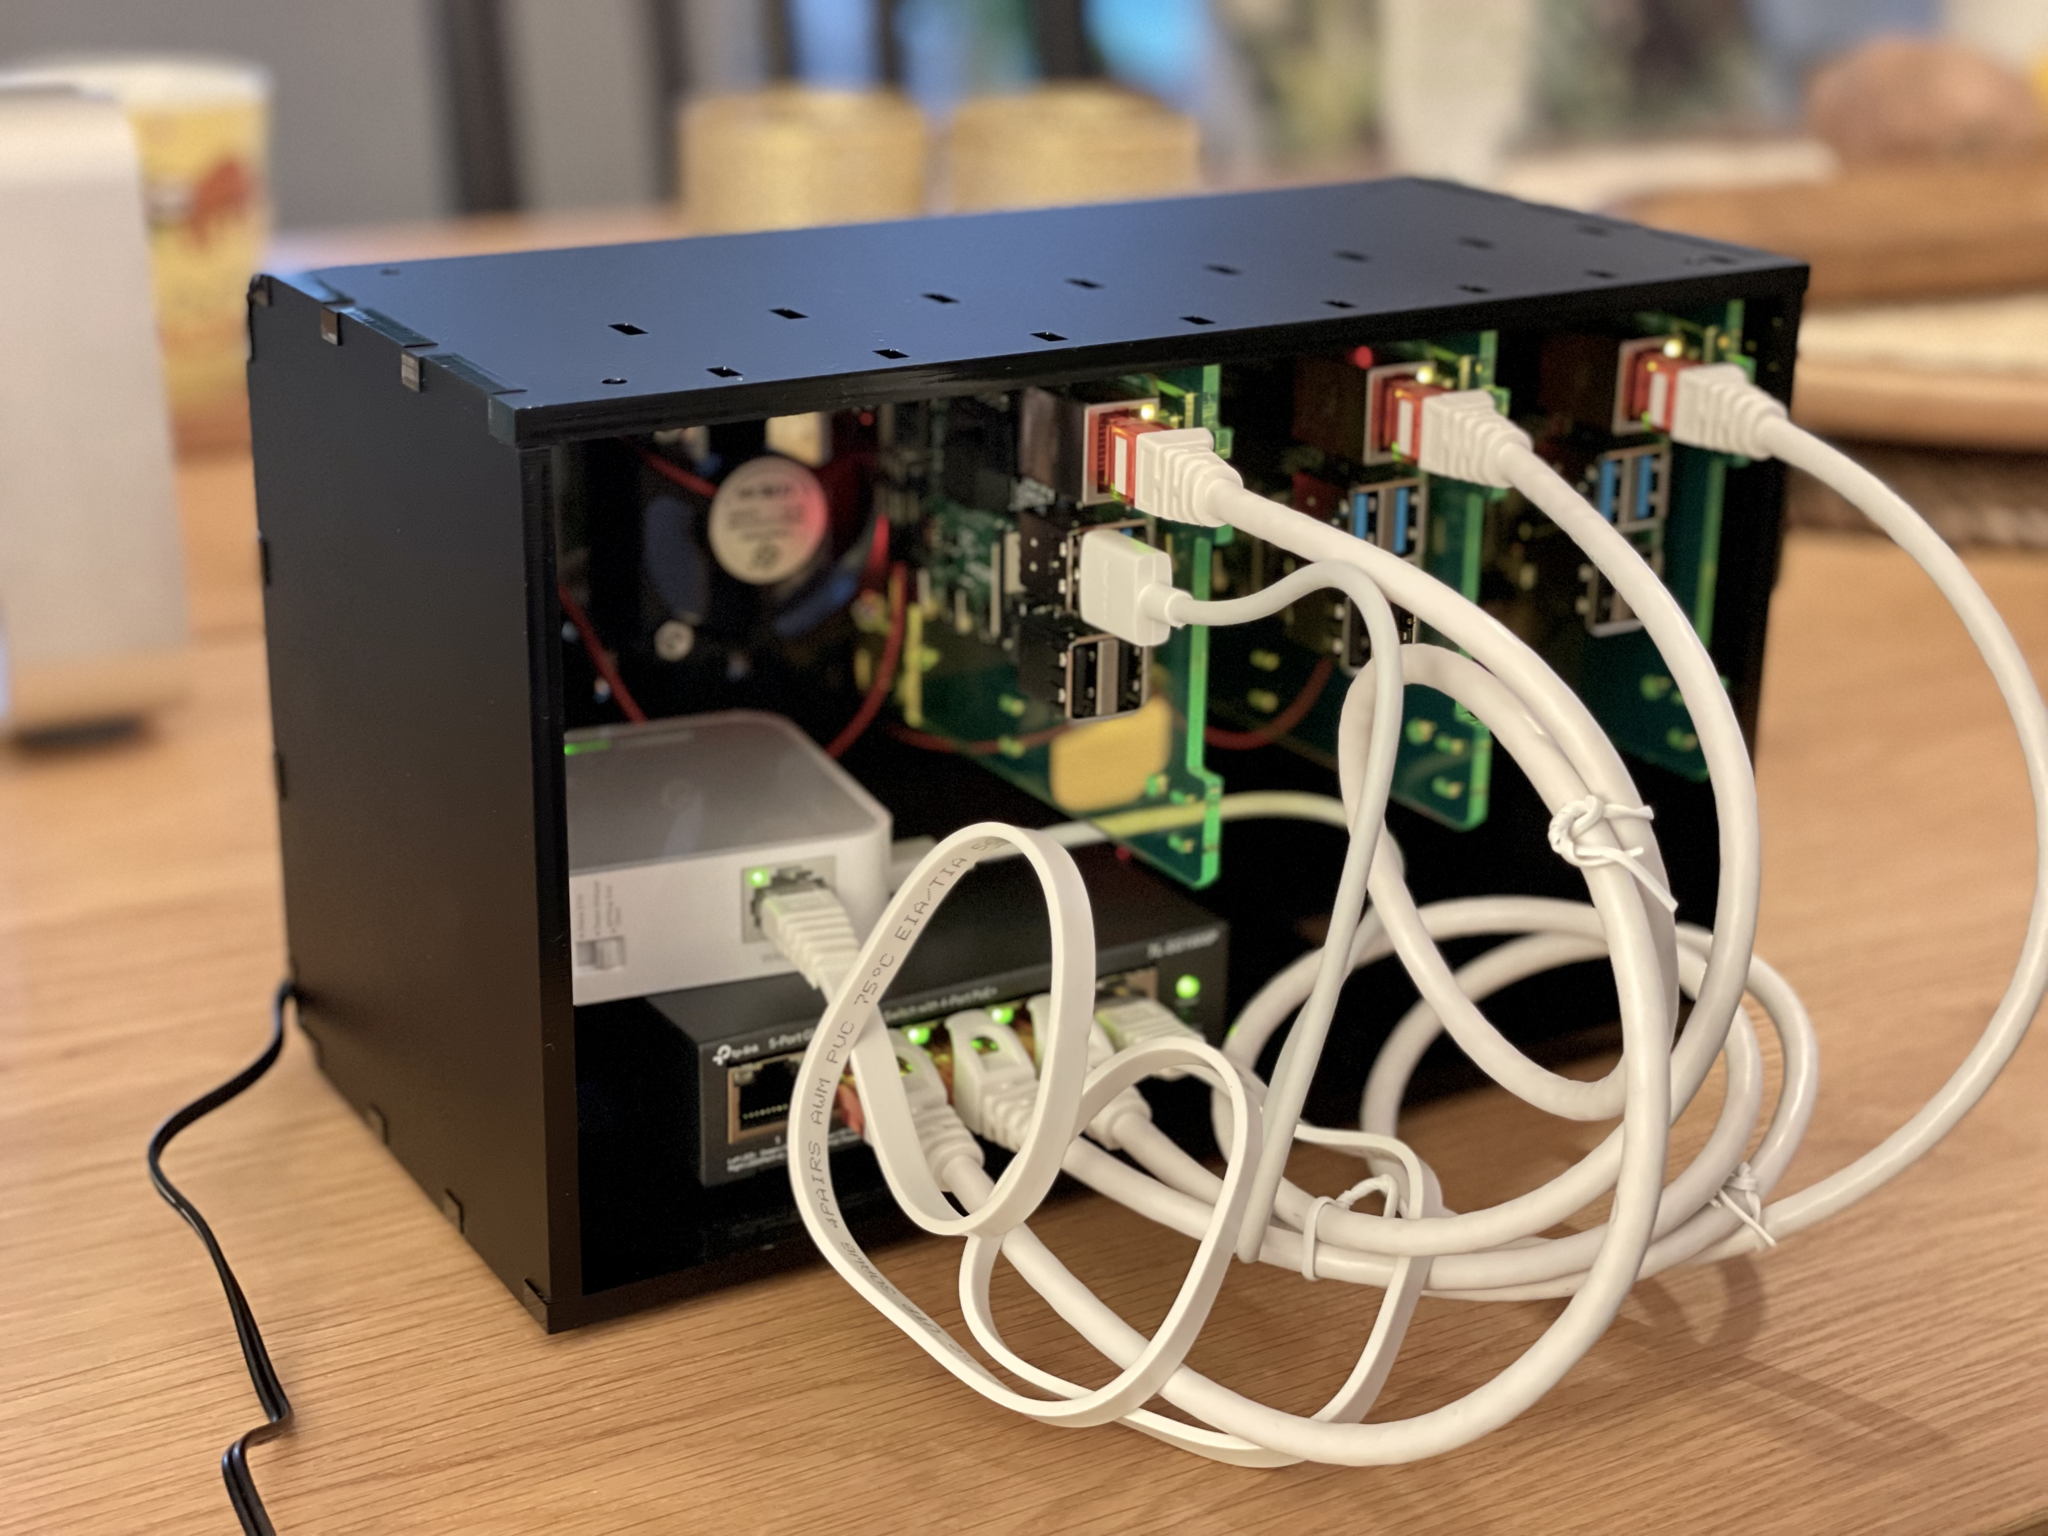 I was too excited to turn the cluster on for the first time, so I made a mess with the cables.
Flashing the OS image
Next up, I flash an OS image into each of the Micro SD cards. For this I use Raspberry Pi Imager. I also heard good things about Etcher, so feel free to try that one too.
I’m using Ubuntu Server 64-bit. Since each node has 8GB of memory available, I need a 64-bit OS to take advantage of all that space. I use Ubuntu since it’s well supported, and I’m quite familiar with it already. You can use the OS of your choice.
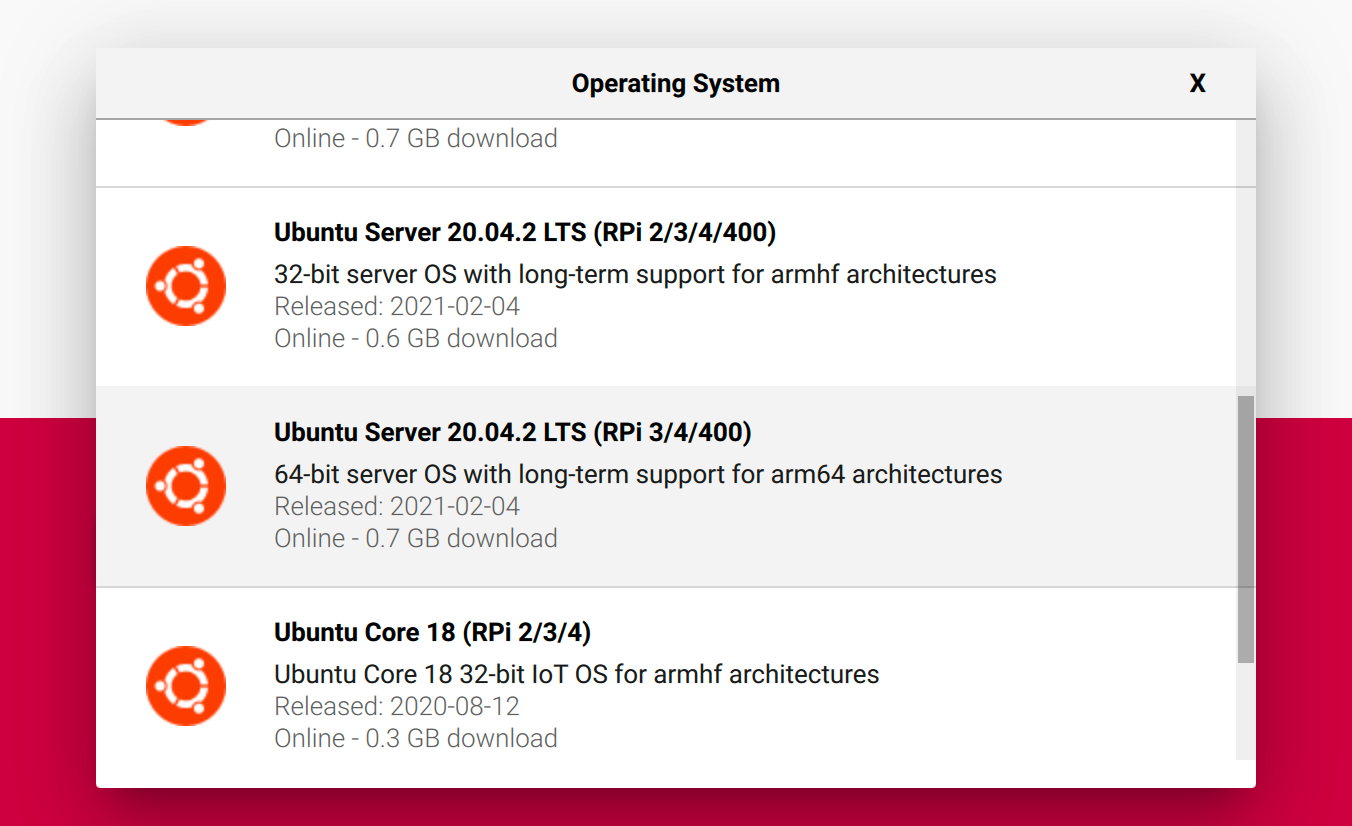 Using Raspberry Pi Imager to flash Ubuntu Server onto the microSD card.
There's a few things I want to pre-configure on each node once it boots. For that I used the user-data file, which follows the cloud-init spec. With this file, I can configure each node to:
- Enable SSH access.
- Pre-authorize my SSH key.
- Disable password access.
- Set up a non-root user.
- Define the hostname for each node.
I want to set the hostname for each node so that I can easily identify it once it joins the network. It will come in handy later when the nodes need to talk to each other to form a cluster.
Here's what the user-data file looks like (notice there's a few variables that should be replaced):
# See cloud-init documentation for available options:
# https://cloudinit.readthedocs.io/

ssh_pwauth: false

groups:
  - ubuntu: [root, sys]

users:
  - default
  - name: junglet
    gecos: junglet
    sudo: ALL=(ALL) NOPASSWD:ALL
    groups: sudo
    ssh_import_id: None
    lock_passwd: true
    shell: /bin/bash
    ssh_authorized_keys:
      - <ssh-pub-key>

hostname: junglet-<num>
The name junglet is just the pet name I use for the cluster. Every node will have the hostname in the form: junglet-<node-number>. You're free to pick something else.
Setting up the router
Some of you might be wondering why I would need a router if I already have a switch to connect the nodes.
The router plays an important role: it assigns IP addresses to each device on the network (dynamically via DHCP, or manually using static IPs), and it also becomes the Internet gateway for the private network. Without it, the nodes wouldn’t be able to reach the Internet.
If you don't want to buy a router, you could turn one of the Raspberry Pis into a router, and use that as your Internet gateway. I didn't try it, so your best bet is to search for guides on how to do that. I'll focus on using a router here.
Within my private network, Internet connectivity comes by having the router, join my home network via WiFi, and use that as a default route. I could connect to the Internet via an Ethernet cable too, but I want the flexibility to have the cluster sitting next to me, in whichever room I might be in my home, and even take it with me on the go. So WiFi for Internet access it is.
With that said, let's configure the network on the router. First things first: I set a stronger password than admin on the router admin panel. While I don't expect anyone snooping around there, and I'm not a security expert, I heard passphrases are generally a good idea.
I then set the network range that the router should use to allocate addresses. I picked 10.42.42.0/24, which gives me 254 IPv4 addresses to work with (256 available addresses minus the broadcast address, and network address). I only have 3 nodes plus my dev laptop, so that's more than enough.
[Dev laptop]                   Internet
|                              ^
|                              |
|                              |
|                              |
+------> [Home router] --------+
         192.0.0.0/24
              ^
              |
              |
              v
       [Cluster router]
        10.42.42.0/24
         ^     ^     ^
         |     |     |
         |     |     |
    +----+     |     +----+
    |          |          |
    |          |          |
    V          V          V
[Node 1]    [Node 2]   [Node 3]
I then reserve a static IP for each node, this makes the address for each node predictable, which makes SSH-ing to the nodes simpler. Reserving static IPs for each node means that they’ll always have the same IP address, even after restarts and as more devices join the network.
# "junglet" is just a pet hostname

junglet-1   10.42.42.100
junglet-2   10.42.42.101
junglet-3   10.42.42.102
Now that all nodes can talk to each other, and I can reach them at a predictable address, I just need to add a route for my private network to reach the Internet. That way it can perform OS updates, download Docker images, and whatnot.
To be able to reach the Internet from the cluster, I join the private network to my home network via WiFi. It comes down to using the admin interface of my router to connect to an external network, and using that as the default gateway for the cluster network.
Finally, let’s connect to each cluster node to ensure everything is working as expected. I added the following SSH config to my dev machine to make it easier to login to the nodes in the future:
# On my development laptop
# ~/.ssh/config

Host junglet-1
  HostName 10.42.42.100
  User junglet
  IdentityFile ~/.ssh/junglet

Host junglet-2
  HostName 10.42.42.101
  User junglet
  IdentityFile ~/.ssh/junglet

Host junglet-3
  HostName 10.42.42.102
  User junglet
  IdentityFile ~/.ssh/junglet
I can now SSH into any of my Raspberry Pis using the following command:
$ ssh junglet-<node-number> # eg. junglet-1
For example, I can check if junglet-1 can talk to junglet-2:
# Check if port 22 (SSH) is open on another cluster node
$ nc -zv 10.42.42.101 22

Connection to 10.42.42.101 22 port [tcp/ssh] succeeded!
Finally, we’re at the stage in which we can do anything we want with the nodes, they can talk to each other and to the internet too.
What is K3s and how is it different than Kubernetes
While Kubernetes is not exactly simple to setup, I do find it simple to use once you’re familiar with it. That said, unless you’re using a managed offering it’s too easy to shoot yourself on the foot by misconfiguring the cluster, one of its dependencies, or worse mess up an upgrade.
Lucky for us, there’s K3s, a lightweight Kubernetes distribution, optimized for ARM and packaged as a single 40MB binary. It also features a simplified install and update process, which is very welcome.
What’s really great about K3s is that it is Kubernetes - the real thing. I can reuse most of the tooling and knowledge that I’ve acquired over the years about running Kubernetes on AWS/GCP/DigitalOcean and Linode, but on my tiny Raspberry Pi cluster. Few "cloud" technologies really give you that kind of flexibility, and knowledge transfer.
Let’s set up K3s on each node. First, we need to do a couple of things:
- Update system packages.
- Install docker.
- Enable OS container features.
- Reboot.
Here's how I did that:
# Update packages
$ sudo apt upgrade -y

# Install docker
$ sudo apt install -y docker.io

# Check for OS container features enabled
$ sudo docker info

# You should see something like this
#
# WARNING: No memory limit support
# WARNING: No swap limit support
# WARNING: No kernel memory limit support
# WARNING: No kernel memory TCP limit support
# WARNING: No oom kill disable support

# Enable the required container features
$ sudo sed -i \
'$ s/$/ cgroup_enable=cpuset cgroup_enable=memory cgroup_memory=1 swapaccount=1/' \
/boot/firmware/cmdline.txt

# We need to reboot for the kernel flags to take effect.
$ sudo reboot
I enabled container features on the OS kernel, which we’ll be needing for Kubernetes. Updating this requires a system reboot, that's why the last command to restart the node is needed.
Installing K3s on the Raspberry Pi
Tip: You can optionally skip the steps below if you use a tool like k3sup. It automates all the steps required to install K3s on a remote machine, and grant you local access to the cluster.
I need to designate one or more of the cluster nodes as the "server", a node which manages the cluster resources, while the other nodes behave as workers.
Luckily, K3s makes the whole setup a one-liner. I simply run the following command to set up the Kubernetes server node:
$ curl -sfL https://get.k3s.io | sh -
Once the server node is ready, I can grab the token so that the worker nodes can join the cluster securely:
# Copy the cluster token from the server node
$ sudo cat /var/lib/rancher/k3s/server/node-token
Next, on each of the worker nodes I run the following command to setup K3s, and have them join the existing cluster (notice the two variables that should be replaced):
# Don't forget to replace $YOUR_SERVER_NODE_IP and $YOUR_CLUSTER_TOKEN
$ curl -sfL https://get.k3s.io | K3S_URL=https://$YOUR_SERVER_NODE_IP:6443 K3S_TOKEN=$YOUR_CLUSTER_TOKEN sh -
Let's check if I'm able to talk to the cluster from any of the nodes:
# Within a cluster node

$ kubectl get nodes

NAME          STATUS   ROLES                  AGE   VERSION
junglet-1     Ready    control-plane,master   54s   v1.20
junglet-2     Ready    <none>                 54s   v1.20
junglet-3     Ready    <none>                 54s   v1.20
Great, now we have a fully functioning kubernetes cluster, and I can talk to it via kubectl on one of the cluster nodes.
Right now I can SSH into one of the nodes and run kubectl commands to control the cluster. While that's perfectly fine, it would be better if I could manage the cluster from my development laptop. Let's set that up next.
Accessing K3s from my dev laptop
Let’s set up dev access on my laptop by adding the cluster credentials to my local kubeconfig. I already have kubectl installed on my laptop, but you can do so easily via brew on MacOS:
# Install Kubernetes tooling via brew
$ brew install kubernetes-cli

# Also kubens and kubectx are really useful for interacting with namespaces and different clusters
$ brew install kubectx

# Let's check it has been installed correctly
$ kubectl version
I then simply grab the kubeconfig file generated by K3s. It's usually available at the path /etc/rancher/k3s/k3s.yaml on the server node:
$ cat /etc/rancher/k3s/k3s.yaml
In my case, I need to merge it with the one on my development laptop because I also manage other Kubernetes clusters, and I already configured access for them.
If this is your only cluster, you can simply replace the ~/.kube/config file on your computer with the one generated by K3s.
First deploy: Kubernetes dashboard
Let's try out the cluster by installing the Kubernetes admin dashboard. You can follow the official instructions, but for illustration purposes I'm including a basic install below:
# Create a namespace and and switch to it
$ kubectl create namespace kubernetes-dashboard
$ kubens kubernetes-dashboard

# Deploy from the official source
$ kubectl apply -f https://raw.githubusercontent.com/kubernetes/dashboard/v2.2.0/aio/deploy/recommended.yaml
Now let's start a Kubernetes proxy to access the dashboards locally:
$ kubectl proxy
I'm now able to access the dashboard at:
http://localhost:8001/api/v1/namespaces/kubernetes-dashboard/services/https:kubernetes-dashboard:/proxy/#/overview?namespace=_all
 Node stats on the Kubernetes dashboard.
Important: Since the dashboard can control the cluster, you may need to create a Service Account to obtain an access token and login to your dashboard. This seems like a good default, since we don't want anyone to be able to control the cluster just like that.
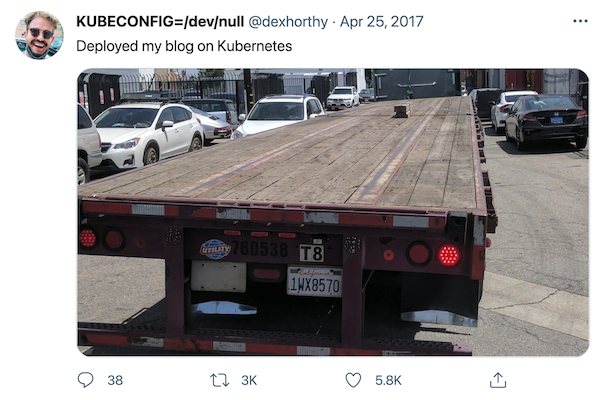
Deploying a Ghost blog on Kubernetes
Next, let's deploy a Ghost blog instance on the cluster. No Kubernetes article is complete without a reference to the "Deployed my blog on Kubernetes" meme:
Since this is for demonstration purposes, I'm deploying a very basic example, without backups or persistent volumes. Deploy to production responsibly.
# Create namespace and switch to it
$ kubectl create ns my-blog
$ kubens my-blog

# A basic deployment
$ cat <<EOF | kubectl apply -f -
apiVersion: apps/v1
kind: Deployment
metadata:
    name: my-blog
    namespace: my-blog
labels:
    app: my-blog
spec:
    replicas: 1
    selector:
        matchLabels:
          app: my-blog
    template:
        metadata:
          labels:
            app: my-blog
        spec:
          containers:
          - name: ghost
            image: ghost:latest
            ports:
            - containerPort: 2368
EOF
We can see the container is being created, and assigned to one of the cluster nodes:
$ kubectl get pods

NAME                       READY   STATUS              RESTARTS   AGE
my-blog-95D54d759c-B2pTt   0/1     ContainerCreating   0          3s

$ kubectl describe pod my-blog-95D54d759c-B2pTt

...
Events:
Type    Reason     Age   From               Message
----    ------     ----  ----               -------
Normal  Scheduled  71s   default-scheduler  Successfully assigned my-blog/my-blog-95D54d759c-B2pTt to junglet-3
Normal  Pulling    72s   kubelet            Pulling image "ghost:latest"
Great! Once the status switches to Running, let's use port-forwarding to access the blog:
$ kubectl port-forward my-blog-95D54d759c-B2pTt 2368:2368
If you go to localhost:2368/ghost, you should be greeted by the Ghost admin welcome screen - ready for initial setup.
If you're planning on using this for your blog, you'll probably need to setup a Service and Ingress so that people can access the deployment from outside your network.
Don't forget to set up some form of backups or persistent volumes, since in my example it's just using ephemeral storage, and it will get wiped if the container restarts. There's numerous guides on how to backup to S3, to a cluster volume, or equivalent. But that's outside of the scope of this post.
Next steps
The cluster is ready and we could do anything we want with it.
If you want to expose a cluster service over the Internet, you'd need to get a static IP from your ISP, and set up port forwarding on the router. After all, this is a bare-metal cluster - we don't get those things for free. These steps would be the same whether you run Kubernetes or not.
There's alternative solutions like inlets, which enable you to expose private services to the Internet without going through the router / home IP.
Here's a few more ideas for what to play with next:
- Self-hosted CI/CD.
- Functions-as-a-Service (eg. OpenFaaS).
- Add network attached storage (we don't want to fry those Micro SD cards).
- Experiment with container support on ARM platforms.
- Use the cluster as a dev environment.
Bonus: Using NGINX instead of traefik as ingress
K3s comes by default with traefik as the ingress controller. I heard great things about it, but I prefer to use ingress-nginx. This is simply because I'm more familiar with it. You can choose pretty much any ingress controller you want for Kubernetes, so pick one according to your own preferences.
In my case, to use NGINX with K3s, all I had to do was to setup the server node with traefik disabled by using the following flags:
# Setup server node with flag to disable trafik, we'll install nginx afterwards.
$ curl -sfL https://get.k3s.io | INSTALL_K3S_EXEC="server --no-deploy traefik" sh
I installed nginx-ingress using helm, which came down to the following commands:
$ kubectl create ns ingress-nginx
$ kubens ingress-nginx

$ helm repo add ingress-nginx https://kubernetes.github.io/ingress-nginx
$ helm repo update
$ helm install ingress-nginx ingress-nginx/ingress-nginx
There's many deployment options depending on your preferences. Just head over to the official documentation and decide what works best for you.
Again, you don't need to do this, as it comes down to personal preference. It's just here for reference purposes if you're also interested in swapping the ingress controller.
Bonus: Building cross-platform Docker images
Since the nodes on this cluster are Raspberry Pi using ARM64 architecture, and most development machines are using AMD64 (x86_64), you might have some trouble building Docker images for your cluster.
You can always check the node architecture and allocatable resources via the following command:
$ kubectl describe nodes
If you're building ARM64 images on x86_64, lucky for us Docker supports building for multiple CPU architectures. That means you can build and publish the same image for multiple target architectures.
Here's an example of how you can build a cross-platform Docker image:
$ docker buildx build --platform linux/amd64,linux/arm64 .
Once you publish that image to your Docker registry, if you try to pull it on a cluster node, it will use the image for the target architecture. In the cluster's case that would be linux/arm64.
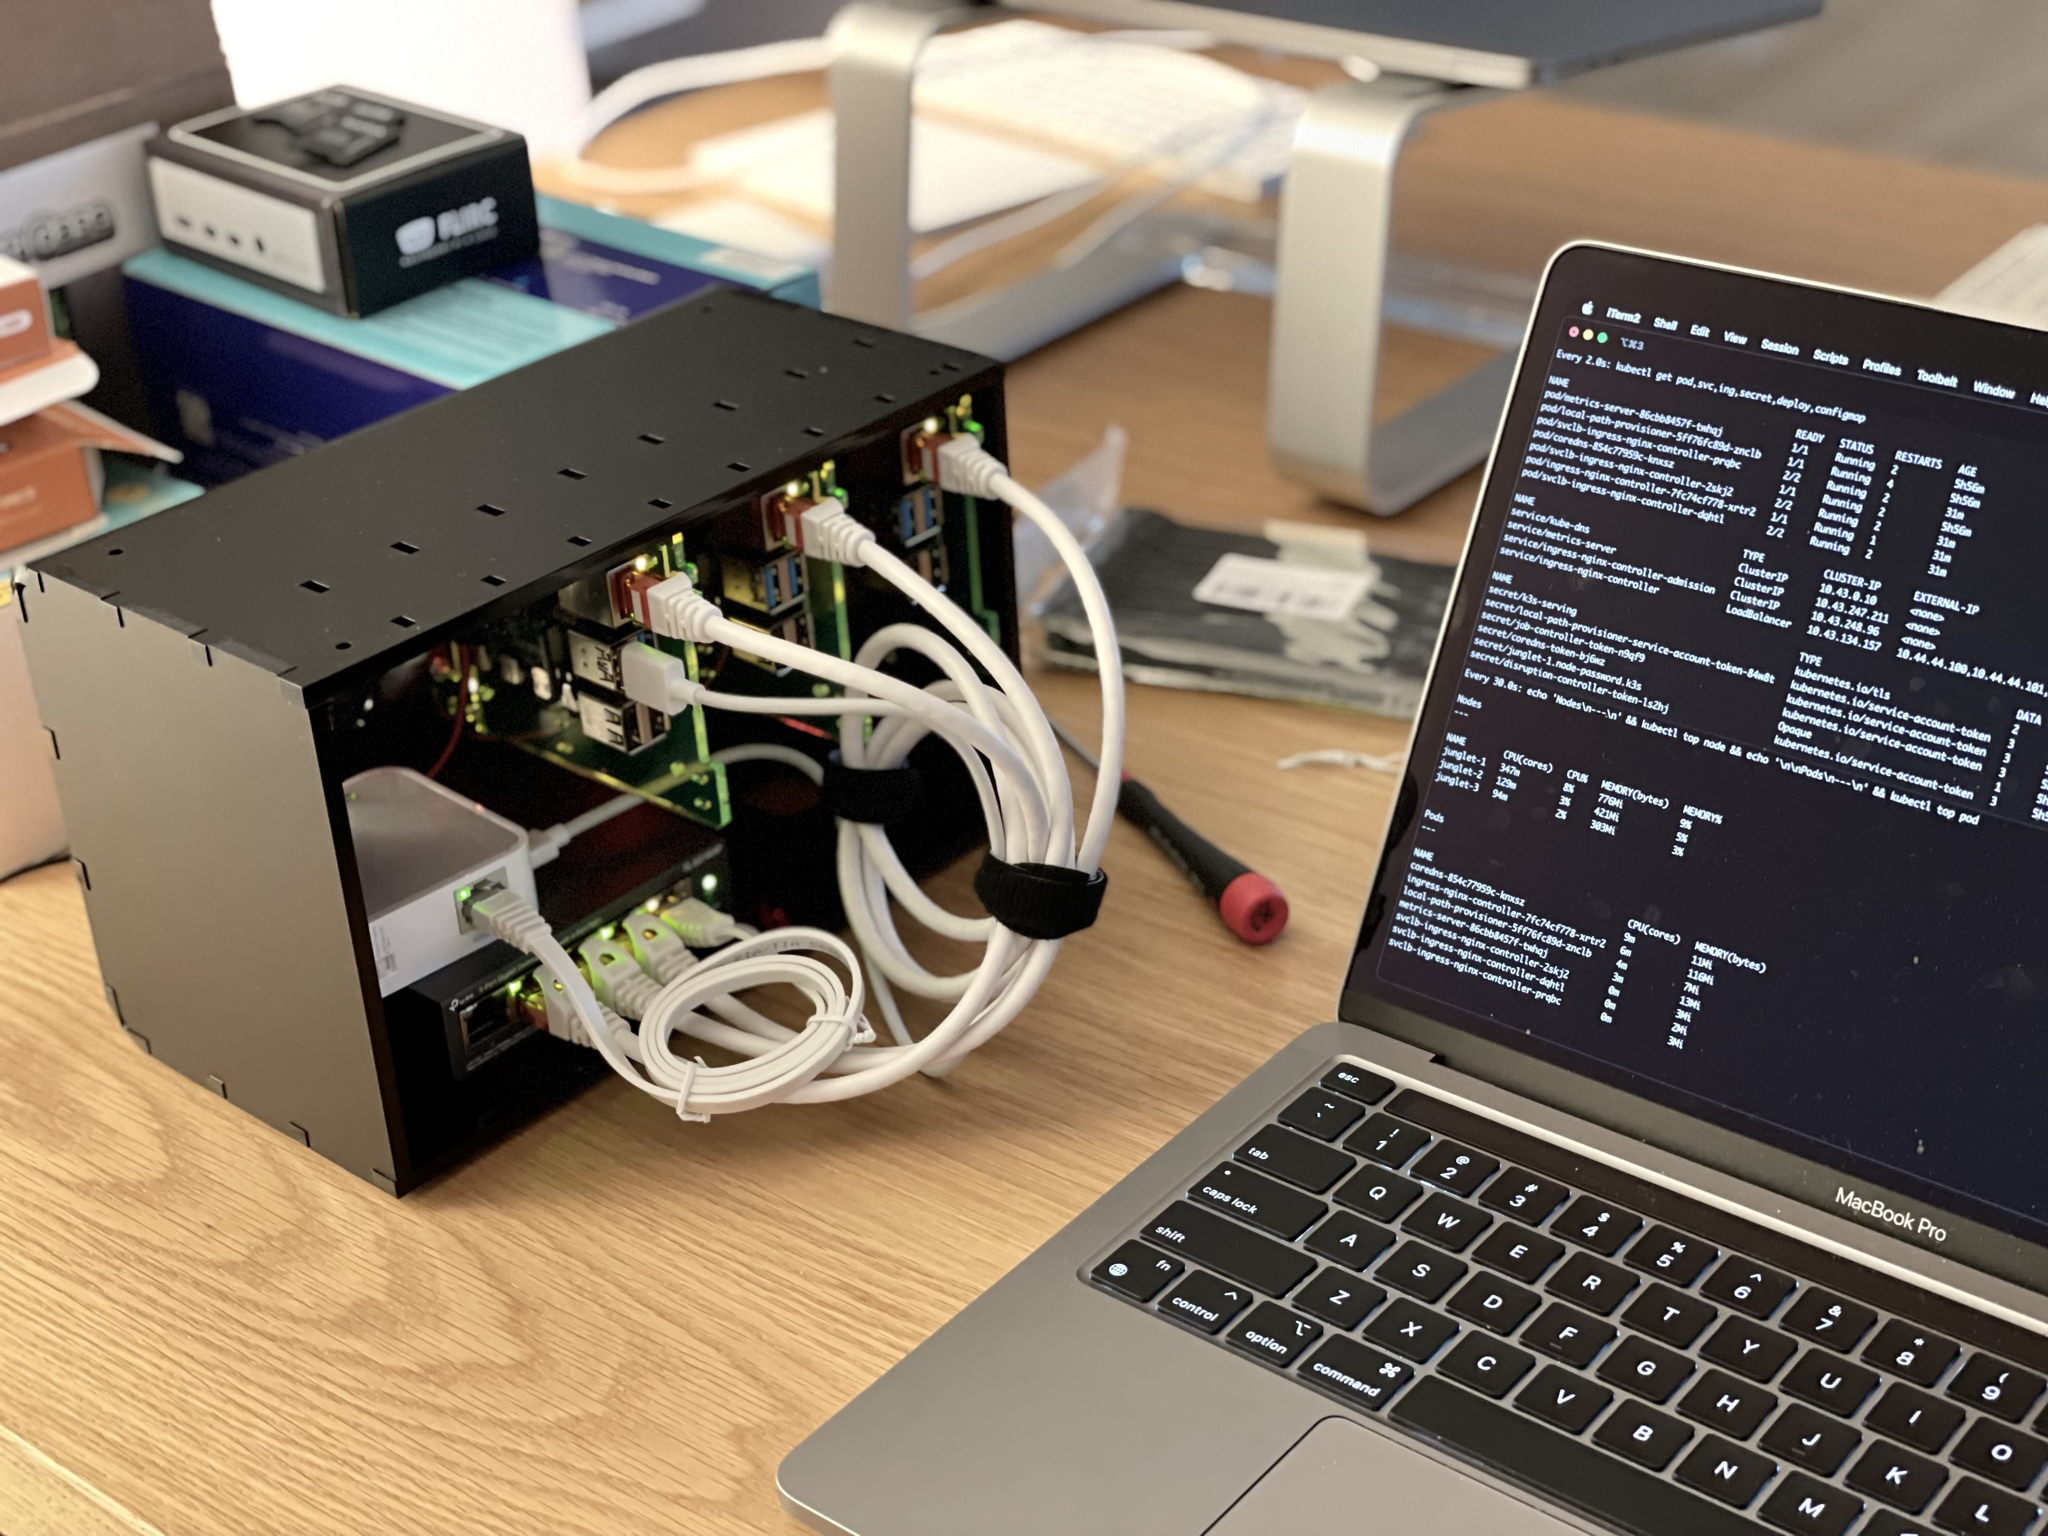
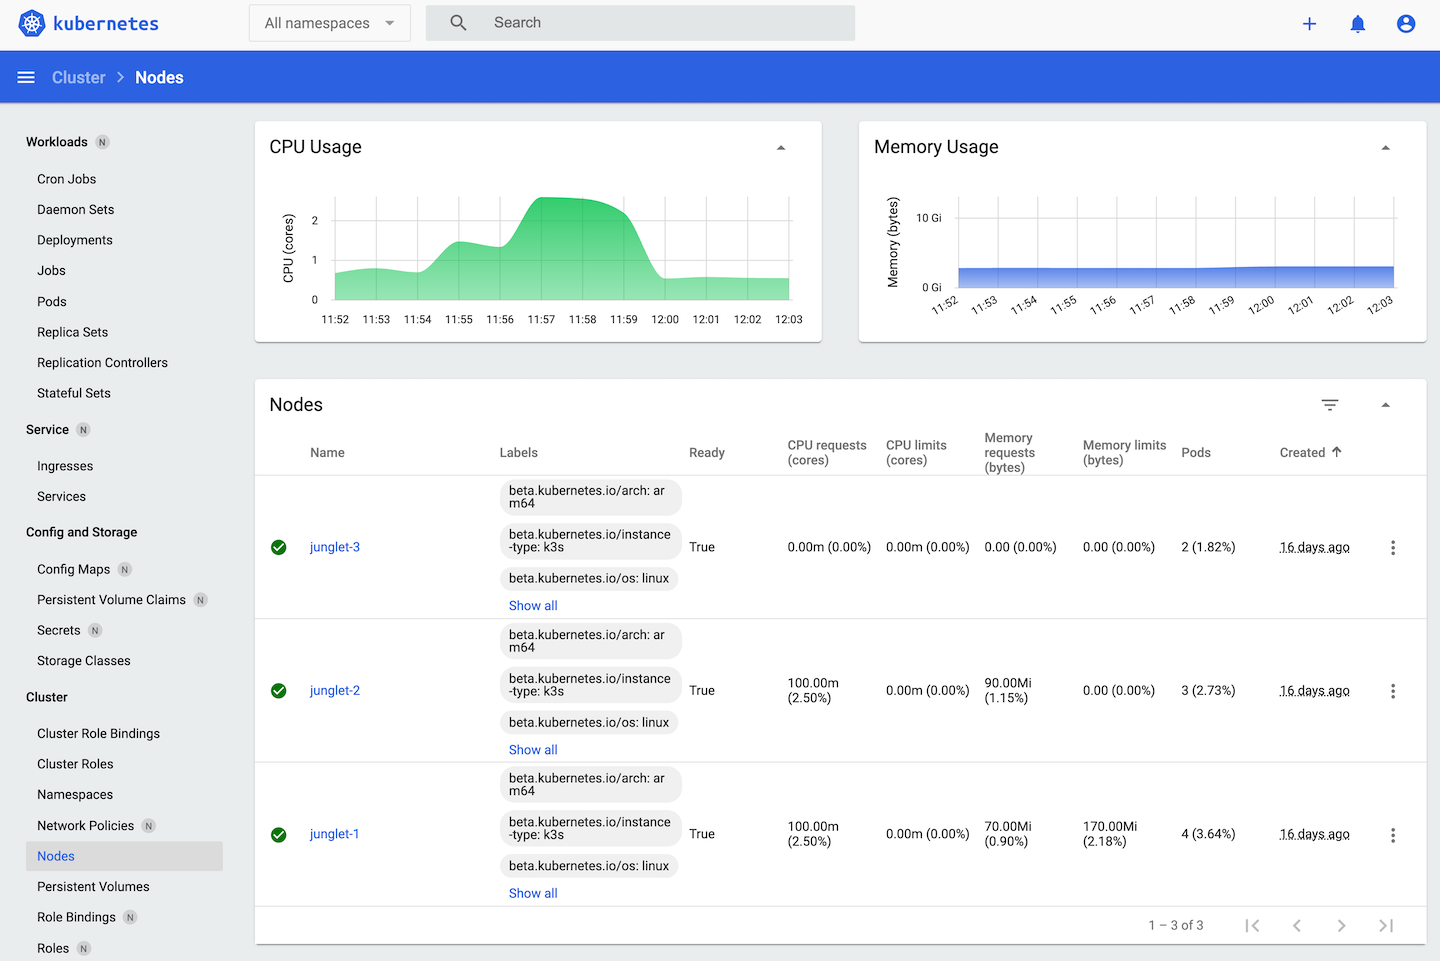
Bonus: Basic node/pod monitoring
You can install Grafana and Prometheus to monitor your cluster resources. But here's a quick tip if all you want is to look at the CPU/Memory utilization:
$ kubectl top <pods|nodes>

NAME          CPU(cores)    CPU%     MEMORY(bytes)   MEMORY%
junglet-1     291m          7%       776Mi           9%
junglet-2     177m          4%       420Mi           5%
junglet-3     88m           2%       303Mi           3%
While it's no time series or fancy chart, it does come handy when all you want is a simple way to check basic metrics. It leverages the built-in metrics server and API, so no need to install anything else.
You can find me on X