Deploying Django with Kamal
Oct 16, 2024 (updated)@anthonynsimon
Over the past years I've mostly gone back to monolithic web apps for my projects. I'm talking about a web server, a database, and a worker process. Maybe sprinkle in a cache, some object storage, or a CDN, but that's about it.

I've used a variety of platforms to deploy these apps, from bare EC2 instances to Kubernetes to managed container platforms such as Fargate, ECS, and Render.
However, I often find myself simply running Docker on a trusty Ubuntu VPS. It's easy to understand and there are few moving parts.
So lately, I've been tinkering with Kamal (formerly known as mrsk) for deploying my apps.
Here's what I like:
- Deploy anywhere. I can throw my entire app into a single $5/mo instance on Hetzner (hello 20TB egress), or anywhere I can SSH into an Ubuntu server.
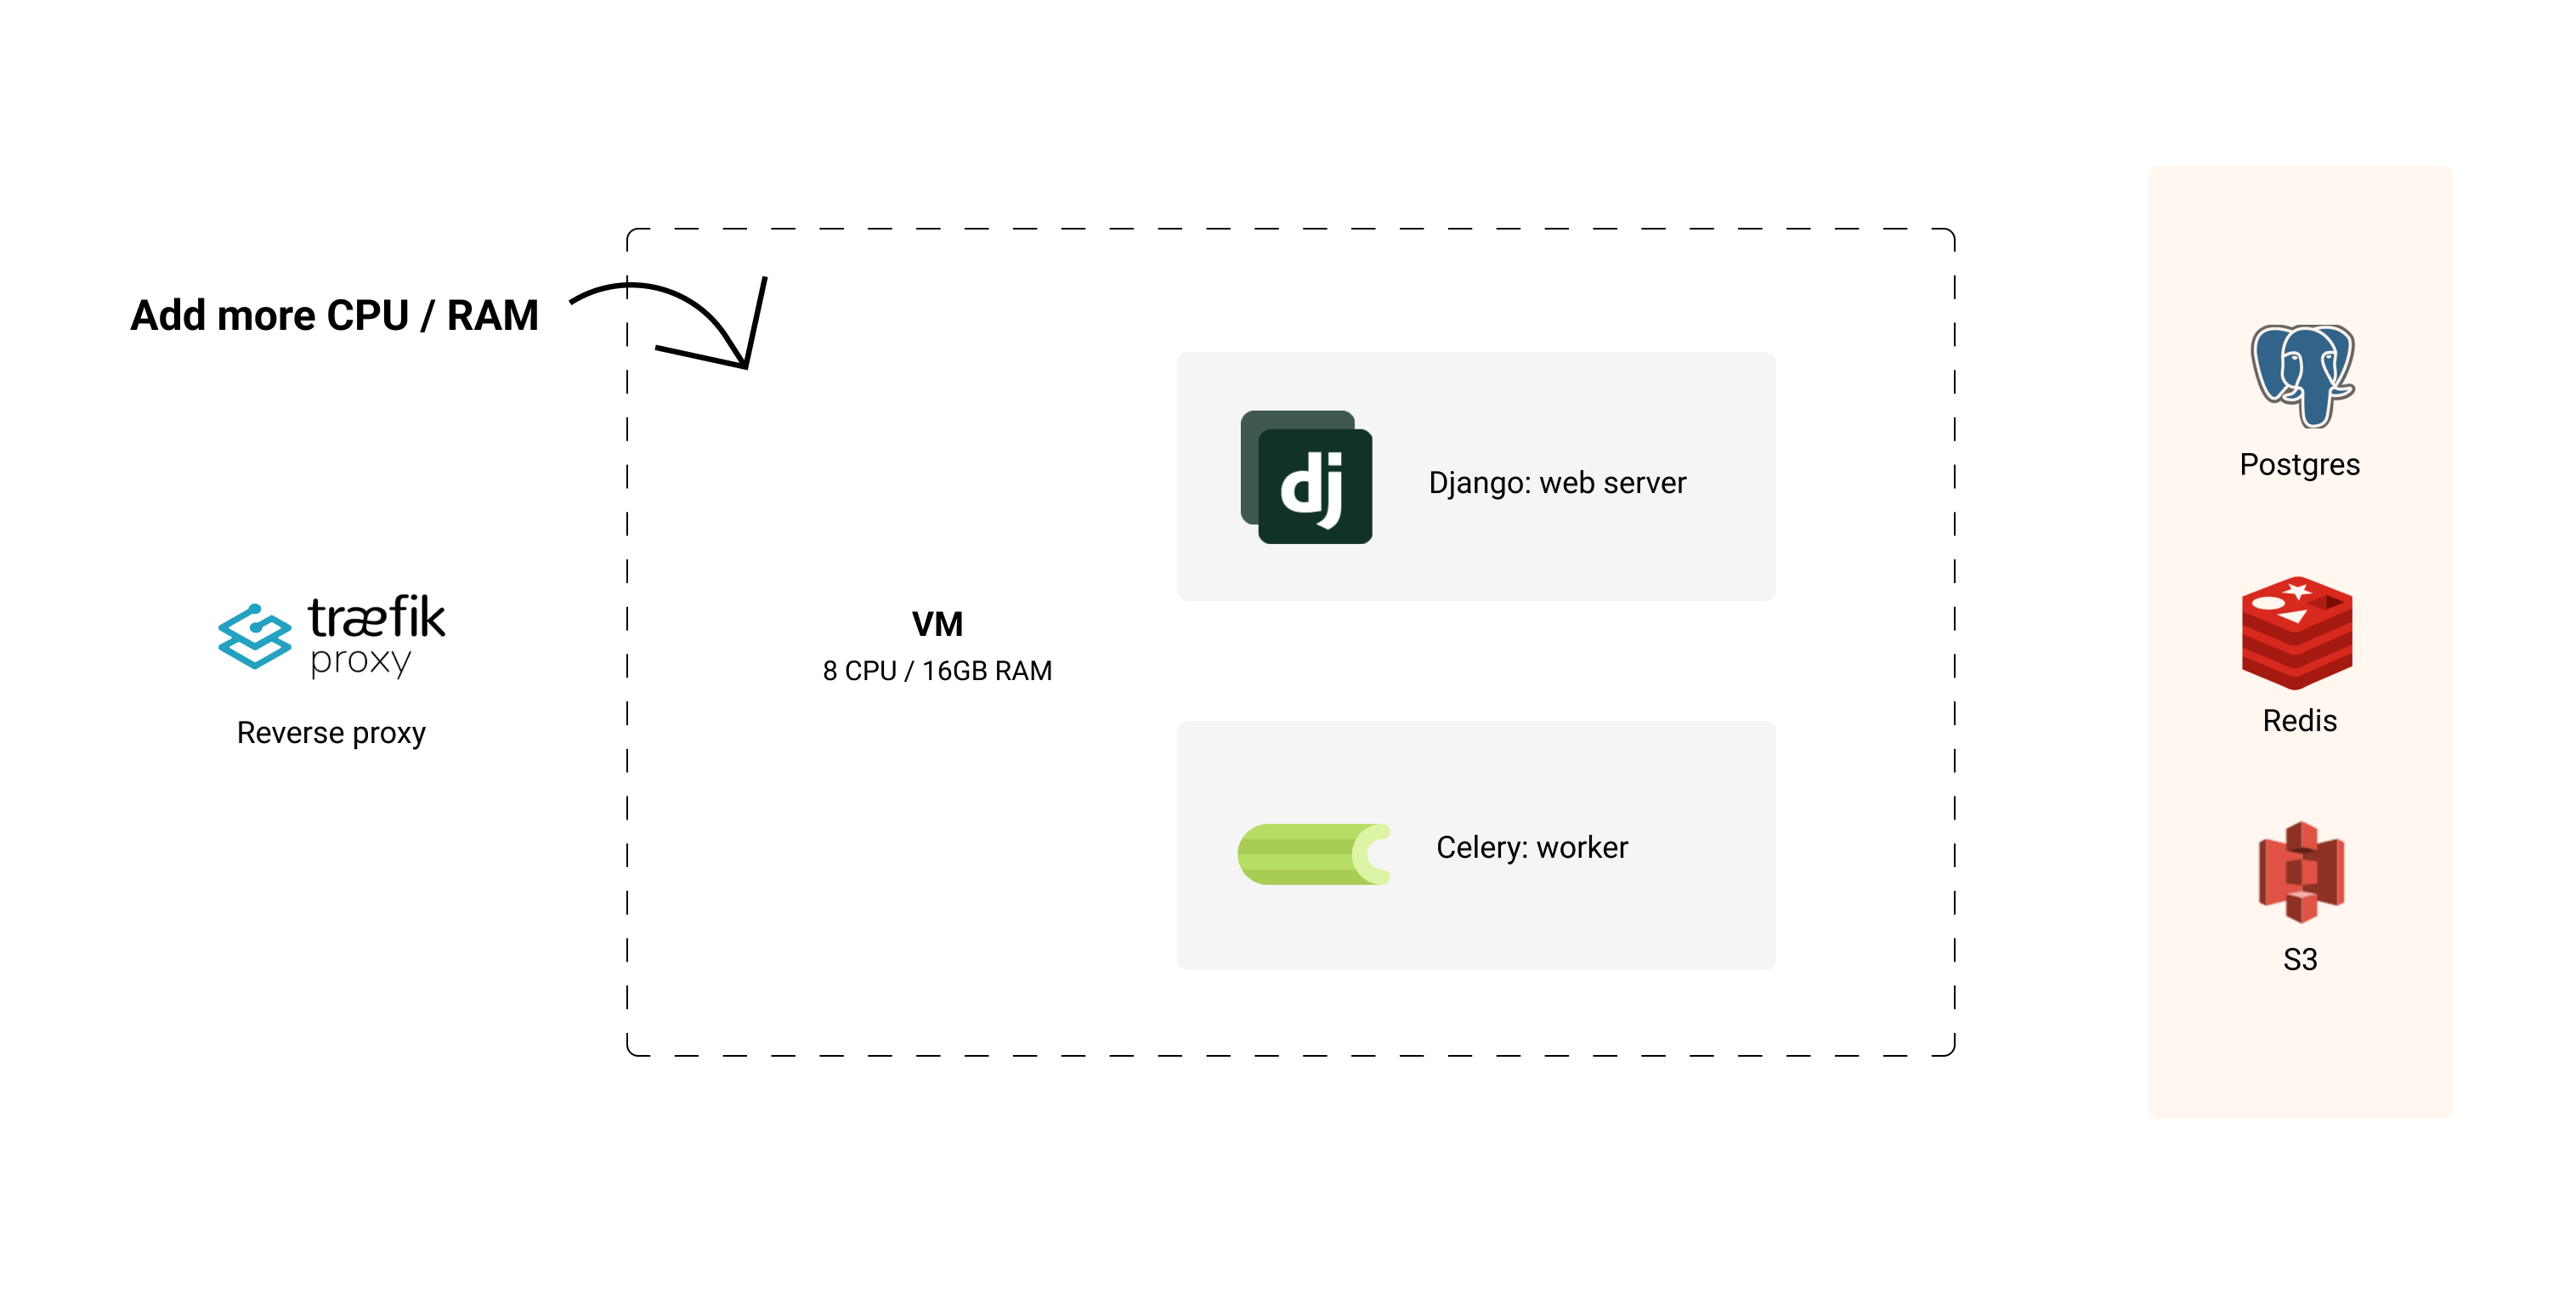
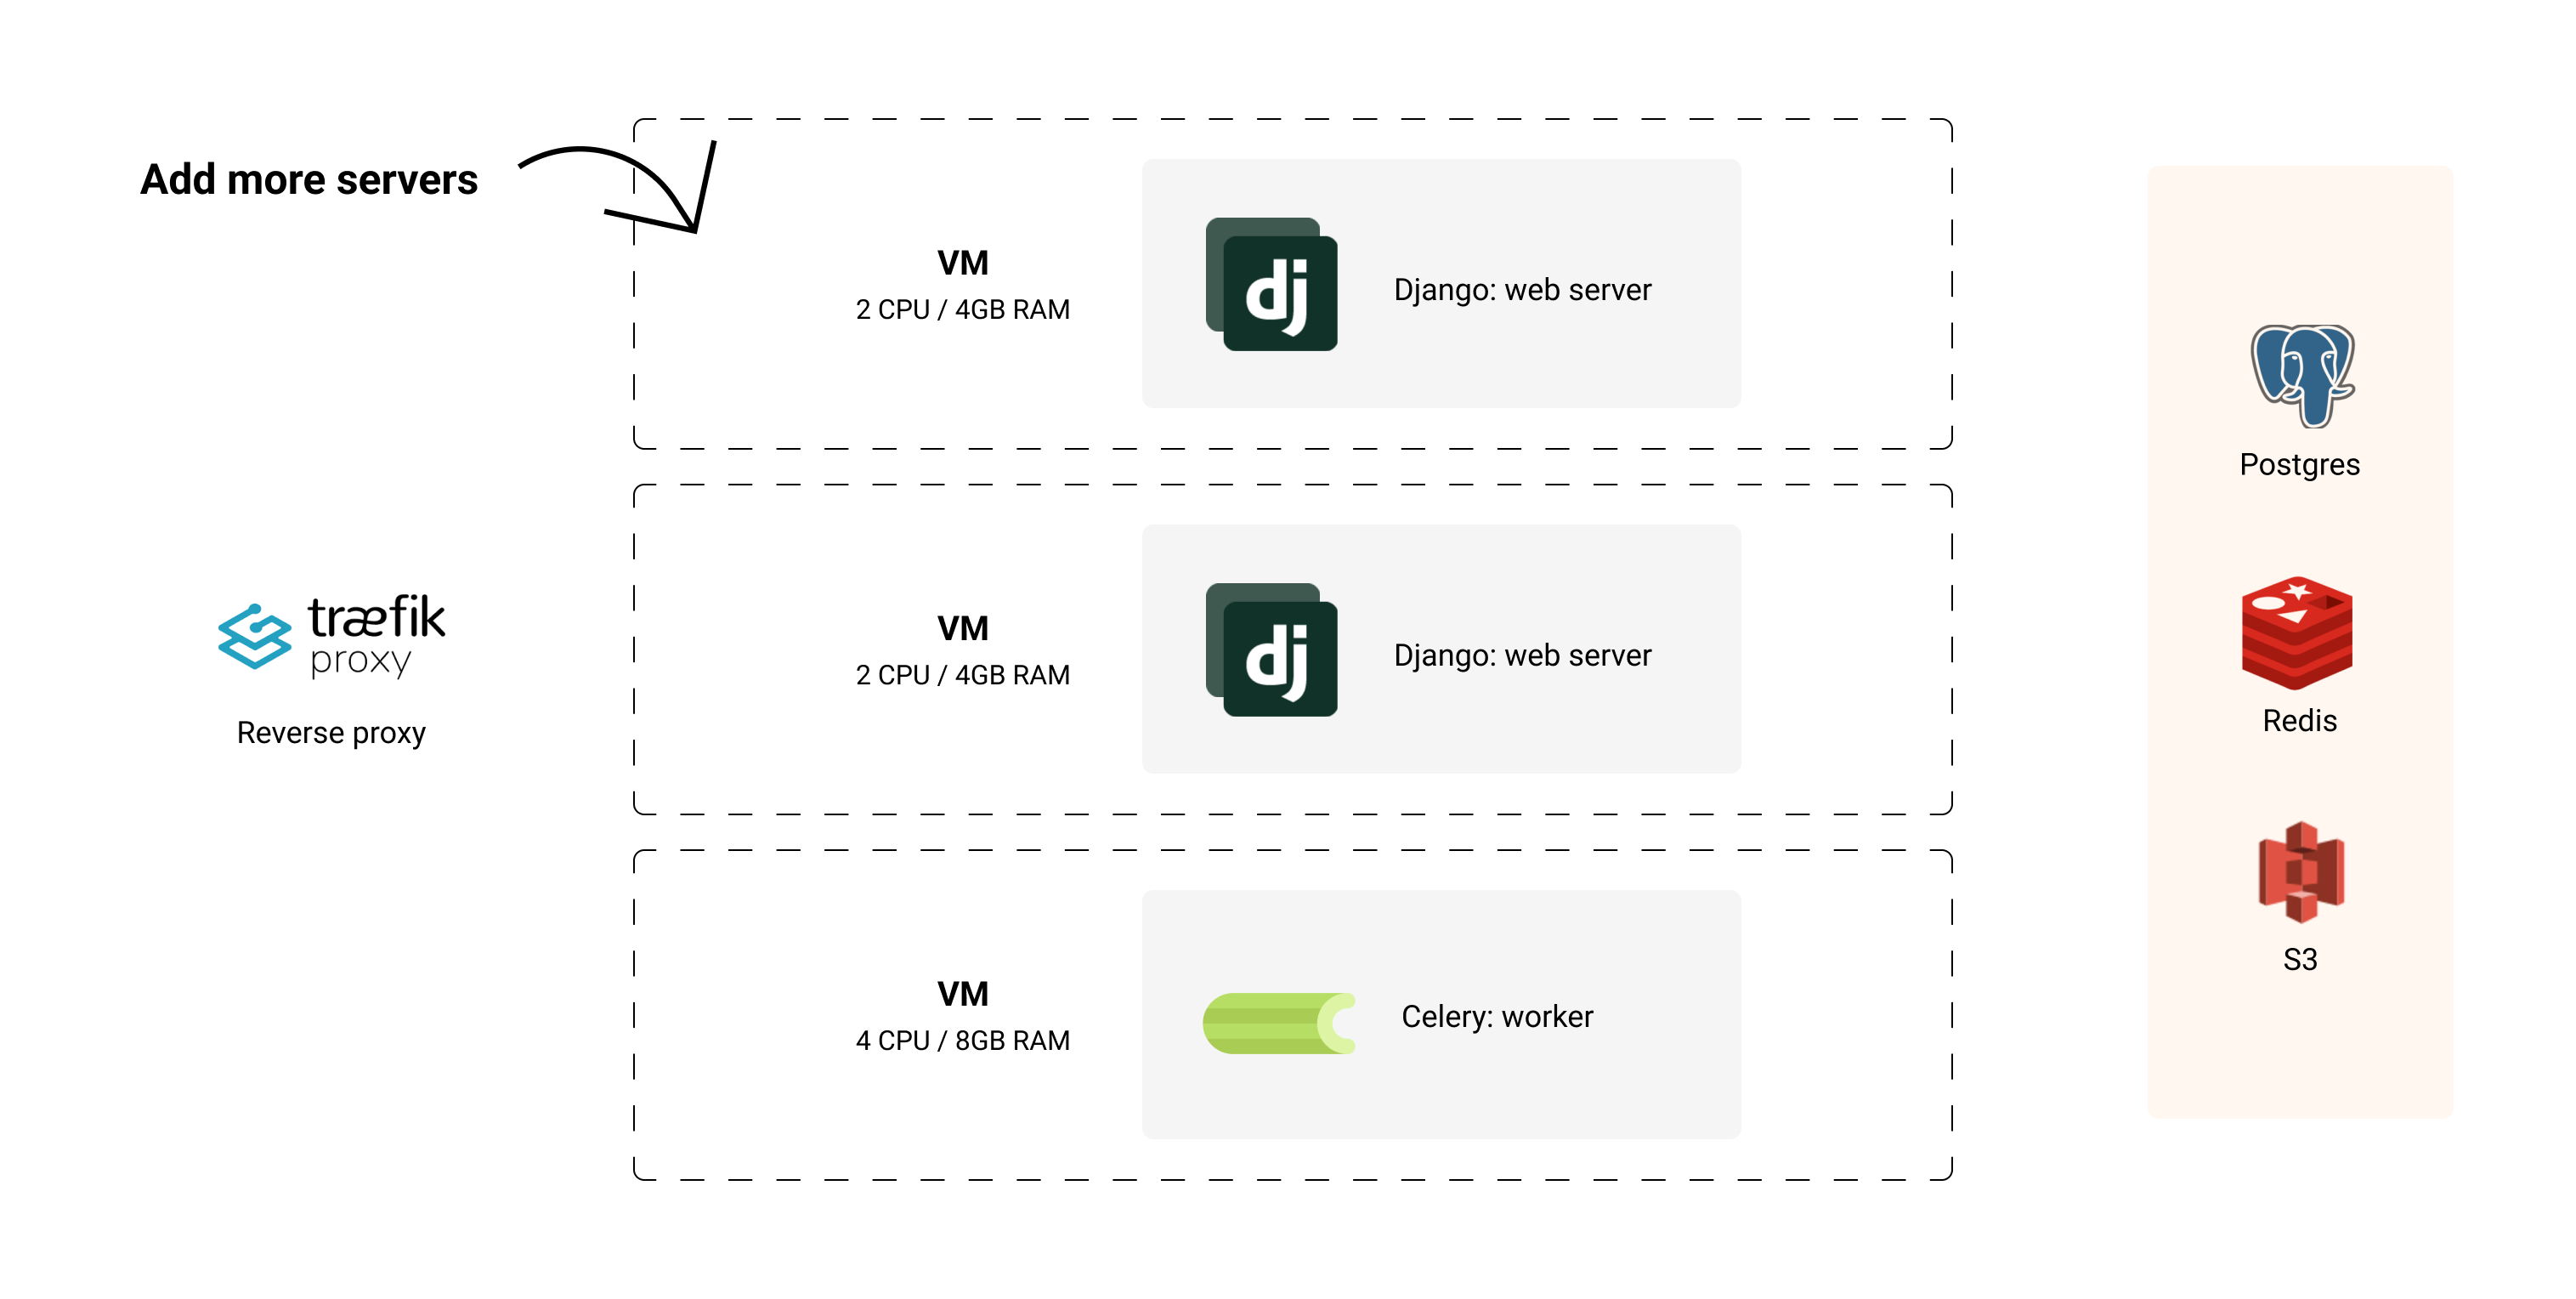
- Scale up, then out. Need more oomph? Add more CPU and RAM. Need even more power? Add more servers.
- It's just Docker. Kamal itself is mostly a bunch of scripts to automate Docker deploys.
- Batteries included. Automated TLS certs, zero downtime deploys, secrets, healthchecks, logs, and company.
In this post I'll walk you through my template to deploy a Django monolith, but you can also use it for Rails or Laravel. Most of the building blocks are the same.
Table of contents
- Deployment config
- Reverse Proxy
- The Dockerfile
- Web and Worker Containers
- Database and Cache
- Encrypted Secrets
- Scaling
- Security
- Conclusion
Deployment config
In Kamal, all resources are defined in a single config file. Similarly to a docker-compose.yml file, you define containers with ports, environment variables, entrypoint commands, memory limits, and so on.
You can also define to which servers each container should be deployed to (could be all in one host, or multiple hosts).
Then, when you run kamal deploy it will SSH into each server, prepare it with any necessary dependencies, build and push the latest images to the docker registry, and finally perform a zero downtime rollout.
For example, below is the config/deploy.yml file I use to start hacking on my projects on a single VM:
service: example
image: your-repo/example

env:
  secret:
    - SECRET_KEY
    - DATABASE_URL
    - CACHE_URL

proxy:
  ssl: true
  host: example.com
  app_port: 8000
  healthcheck:
    path: /
    interval: 5

servers:
  web:
    hosts:
      - 1.2.3.4
    cmd: bin/app web

  worker:
    hosts:
      - 1.2.3.4
    cmd: bin/app worker

  scheduler:
    hosts:
      - 1.2.3.4
    cmd: bin/app scheduler

accessories:
  db:
    image: postgres:15
    host: 1.2.3.4
    port: 127.0.0.1:5432:5432
    env:
      secret:
        - POSTGRES_DB
        - POSTGRES_USER
        - POSTGRES_PASSWORD
    volumes:
      - /var/postgres/data:/var/lib/postgresql/data

  redis:
    image: redis:7.0
    host: 1.2.3.4
    port: 127.0.0.1:6379:6379
    cmd: --maxmemory 200m --maxmemory-policy allkeys-lru
    volumes:
      - /var/redis/data:/data

registry:
  username:
    - DOCKER_USERNAME
  password:
    - DOCKER_PASSWORD

builder:
  arch: amd64
  remote: ssh://1.2.3.4
  cache:
    type: registry
    options: mode=max
    image: your-repo/example-build-cache

# Bridge fingerprinted assets, like JS and CSS, between versions to avoid
# hitting 404 on in-flight requests. Combines all files from new and old
# version inside the asset_path.
asset_path: /opt/app/staticfiles
Let's explore some of the interesting bits.
Reverse Proxy
The web containers are being exposed to the public internet via kamal-proxy.
The proxy's role is to terminate TLS connections, load balance traffic to the corresponding containers, perform healthchecks and zero-downtime deployments. It also automatically issues and renews TLS certificates via Let's Encrypt.
...
proxy:
  ssl: true
  host: example.com
  app_port: 8000
  healthcheck:
    path: /
    interval: 5
...
The Dockerfile
Below is the Dockerfile I use for my Django projects. It's a multi-stage build that first builds all static assets in a Nodejs container, and then copies them to a leaner Python runtime container.
ARG NODE_VERSION=18 ARG PYTHON_VERSION=3.11 # Build assets FROM node:$NODE_VERSION as build WORKDIR /opt/app/ COPY package.json yarn.lock ./ RUN yarn install COPY . . RUN yarn build:js RUN yarn build:css # Runtime FROM python:$PYTHON_VERSION-slim as runtime WORKDIR /opt/app/ RUN groupadd -r nonroot RUN useradd -g nonroot --no-create-home nonroot RUN apt-get update -y && apt-get install -y curl postgresql-client # Setup virtualenv ENV PATH="/opt/venv/bin:$PATH" ENV PYTHONUNBUFFERED=1 RUN python -m venv /opt/venv/ # Install dependencies before copying application code to leverage docker build caching COPY requirements.txt . RUN pip install -U pip -r requirements.txt # Copy application code (see .dockerignore for excluded files) COPY . . COPY /opt/app/static/assets/ ./static/assets/ RUN python manage.py collectstatic --clear --noinput RUN chown -R nonroot:nonroot /opt/app/ USER nonroot EXPOSE 8000 CMD ["bin/app", "web"]
Web and Worker Containers
My Django web app is served by a single container, while the worker and scheduler containers are executing background tasks via Celery.
...
servers:
  web:
    hosts:
      - 1.2.3.4
    cmd: bin/app web
    options:
      memory: 500m

  worker:
    hosts:
      - 1.2.3.4
    cmd: bin/app worker
    options:
      memory: 500m

  scheduler:
    hosts:
      - 1.2.3.4
    cmd: bin/app scheduler
    options:
      memory: 250m
...
I use the same container for the web, worker and scheduler processes. This is configured via the cmd option, and they share a common entrypoint script.
This is what the bin/app <cmd> script looks like:
#!/usr/bin/env bash

set -e

if [ "$1" == "web" ]; then
  shift
  echo "Checking DB connection"
  scripts/waitfordb

  echo "Applying migrations"
  python manage.py migrate

  echo "Running production server"
  exec gunicorn -c config/gunicorn.py $@
elif [ "$1" == "scheduler" ]; then
  shift
  exec celery -A app beat -l info $@
elif [ "$1" == "worker" ]; then
  shift
  exec celery -A app worker -l info $@
elif [ "$1" == "manage" ]; then
  shift
  exec python manage.py $@
else
    exec "$@"
fi
You may have noticed that I'm using gunicorn to serve my Django web process.
Gunicorn+uvicorn has been my trusty performer for several years now. From past projects, it's proven to be very reliable even at 2,000+ req/s across a couple of cheap instances. More than enough for my needs.
Database and Cache
I use Postgres for my main database and Redis for caching and as a job queue.
...
accessories:
  db:
    image: postgres:15
    host: 1.2.3.4
    port: 127.0.0.1:5432:5432
    env:
      secret:
        - POSTGRES_DB
        - POSTGRES_USER
        - POSTGRES_PASSWORD
    volumes:
      - /var/postgres/data:/var/lib/postgresql/data
    options:
      memory: 500m

  redis:
    image: redis:7.0
    host: 1.2.3.4
    port: 127.0.0.1:6379:6379
    cmd: --maxmemory 200m --maxmemory-policy allkeys-lru
    volumes:
      - /var/redis/data:/data
    options:
      memory: 250m
...
Stateful services like Postgres and Redis are a bit of a pain to manage. So I usually offload these to a managed service, but it's nice to have the option to run them on a single VM when starting out.
In production, you'd almost certainly want to add automated offsite backups for the Postgres database. Losing data is no fun and can happen.
Encrypted Secrets
I keep my secrets encrypted in-repo. There's a variety of tools to achieve this, but you can also store them in your password manager's vault and turn them into a dotenv file before deploying.
To use them with Kamal it comes down to populating an .kamal/secrets file with the decrypted secrets (don't forget to gitignore it), and then referencing them in your deploy config.
For example, given the following .kamal/secrets file:
SECRET_KEY=supersecret123
DATABASE_URL=postgres://postgres:supersecret456@example-db:5432/db
REDIS_URL=redis://example-redis:6379/0
CLOUDFLARE_DNS_API_TOKEN=supersecret789
Kamal will pull the secrets from that file and inject them into the containers at runtime as defined in the deploy config:
...
env:
  secret:
    - SECRET_KEY
    - DATABASE_URL
    - REDIS_URL
...
Scaling
Scaling a stateless monolith is as straightforward as a sitcom plot: add more resources to the single VM, or scale horizontally by bringing in more servers.
I recommend starting with a single VM and scaling up as needed. It's simple, and you can get a lot done with a single machine.

Then, when you want to scale out, just spin up more servers, stick a load balancer to distribute the traffic and re-deploy your app.

For example, to scale the web containers, I'd create a few more instances on Hetzner and add them as the target hosts for the web server in the deploy.yml config:
...
servers:
  # the web container now runs on 3 new servers
  web:
    hosts:
      - 2.2.2.2
      - 3.3.3.3
      - 4.4.4.4
    cmd: bin/app web
  # the worker container still runs on the original server
  worker:
    hosts:
      - 1.2.3.4
    cmd: bin/app worker
...
From there, rolling out the app to these new servers comes down to:
- Run
kamal deployto set up and start the web container in the new hosts. - Create a load balancer to distribute the load across the new hosts.
- Point my DNS record to the load balancer instead of the single VM.
Yes, it's a manual process vs using something like Kubernetes or a managed service. But to me, it's a small price to pay to keep things simple, especially when I don't expect to need re-scaling often.
Security
This is definitely out of the scope of this post, but you should at least think about:
- Set up a network firewall to restrict access to your instances.
- Only allow SSH access via public keys (disable passwords).
- Ensure your reverse-proxy is not trusting client
X-Forwarded-*orX-Real-Ipheaders. - Keep your OS and packages up-to-date.
- Set up rate limiting.
I cover some of these measures in another post.
Conclusion
In short, if you just want to deploy containers on a remote machine, Kamal automates many common steps without introducing the complexity of something like Kubernetes.
I like that it's uncomplicated, and you can deploy it anywhere where you can spin up an Ubuntu VPS and SSH into it.
You can find me on X